Step by step stickmaking: how to craft a ram’s horn crook


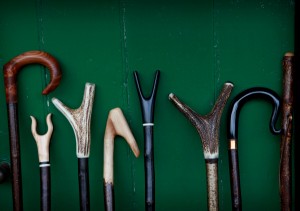
The modern ram’s horn shepherd’s crook has come a long way since it was first fashioned by shepherds in their crofts: from a purely practical tool with which to catch sheep with by neck or foot to a highly decorated piece of art work for stickmaking shows and competitions.
In the past the shepherd may have used the heat from a peat fire or that of a candle to bend the ram’s horn to a rudimentary shape good enough to fulfil his needs. Today, however, the whole process of making a ram’s horn crook is quite a bit different, relying on electric hot air guns and various metal jigs and bottle jacks to help form the horn into the desired shape. In this post, I take readers through the process of turning a raw horn into a desirable walking stick.
Preparations
The first requisite is to source a ram’s horn without natural damage caused by rams fighting, the rubbing of the horn against a wall to rid itself of fly, or the damage inflicted on the horn by the farmer, who may cut a slice of horn closest to the face to stop it causing the ram discomfort as it grows inwardly. Damage can also be caused by the farmer drilling holes in the horn to tether the ram, sometimes to another ram to stop them being able to fight.
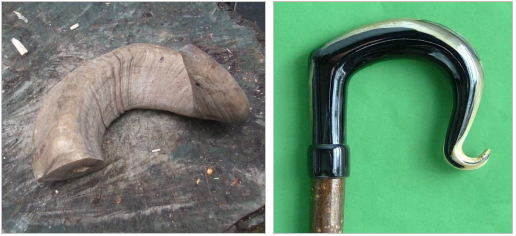
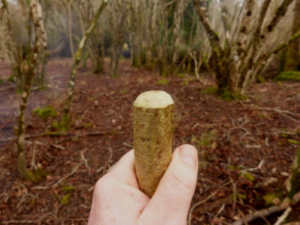
Assuming we have our ram’s horn in good condition from a breed that should make a nice stick (not all breeds are as suitable as others when it comes to making a crook) we are ready to proceed. The first operation is to cut back the horn that was closest to the ram’s head. The horn has grown on a bony peg on the ram’s head and, once removed from the ram and dried over a year, will leave a cavity where the bone peg had been. We cut away enough horn to leave this hole no bigger than about an inch and a half in diameter. The horn in this area will later need to be heated and closed or compressed into a smaller hole. For now however we need to boil the horn for an hour or two to make it malleable enough so that it can be pressed and flattened in a press with the use of a bottle jack.
Bulking
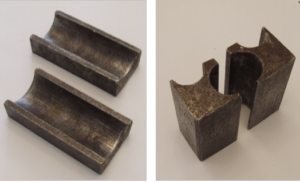
Once cooled overnight the horn can have some of its irregular bulk removed if necessary. With a big horn you may have to remove quite a lot of surface horn to start the next operation, which is bulking. Bulking is the process of squeezing the horn in metal shells to compress the horn’s inner softer material. This inner material cannot be polished, so it is compressed as much as possible so that only the hard outer layers of the horn are worked and finally polished.
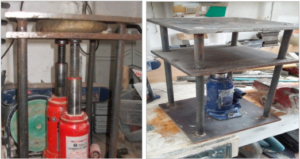
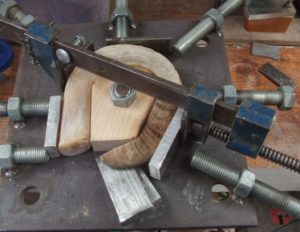
The area of horn that was closest to the head is heated using a hot air gun or preferred source of heat. Horn for a length of some four to five inches needs to be heated and once malleable is placed between the previously mentioned shells and squeezed under the pressure of the bottle jack. These shells must be controlled in the up and down movement of this operation and so should run in channels in the bulking jig.
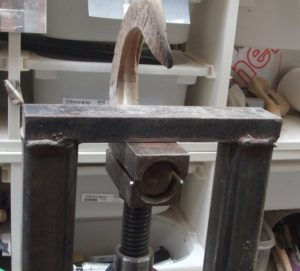
The picture above demonstrates the action of the bulking jig. This horn has already been through this and subsequent stages. The top shell is locked in place, the horn heated and presented to the top shell, while the bottom shell is moved upward against the horn by the bottle jack, so squeezing the horn for a inch or so. As this action progresses the horn is repeatedly heated and moved further and further into the jig, until most of the horn has been squeezed.
Forming the neck of the crook
We now have a horn that resembles a horseshoe and needs a little cleaning of the welt left behind by the shells. Our next operation is to form the neck of the crook handle. This will normally be in the region of about four inches long and needs to be straight. This whole area is heated once again and this time the shells used resemble channels and are placed around the area which will form the neck of the crook. The operation can start with a pair of large shells and, once the horn is straight, further compressed by a pair of slightly smaller shells.
After the final squeeze with these channels or shells the horn needs to be left overnight before the shells can be removed ensuring that the horn has set to a straight form. We are now left with a horse shape horn with a straight side and circular in cross section.
Alternatives to bulking
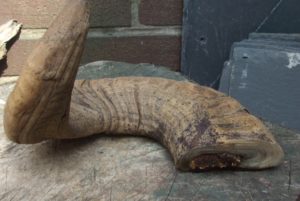
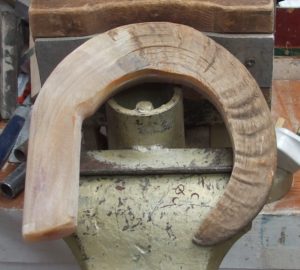
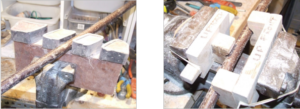
Now not wanting to confuse the reader, there is an alternative to the earlier bulking process, and it is one I prefer. That of squeezing the hot horn between a pipe or dolly in a vice jaw against a curved surface on the opposite jaw. While I cannot generate the same tonnage in a vice that I could by using a bottle jack, the hot horn still moves if I use a large steel tube to close the vice jaws. The vice in use is one of the biggest and heaviest I have come across and can take as much leverage as I can exert upon it.
The horn above would be heated on both the top and bottom surfaces and slowly fed between the pipe and plate until the whole horn had been worked. This method is not as destructive to the horn as using the short shells to bulk up and does not produce a welt of material that later needs removing. While we are on the topic of bulking, there is a problem that can occur with quite a few horns and that is of the horn folding over on its self while being squeezed. It should be of no surprise, as the horn grows with a concave side and the other surface is convex. Therefore there is a natural tendency for the horn to follow these curves when being squeezed. Sometimes this problem can be minimised by using the pipe and plate bulking method, as the horn can be manipulated somewhat easier than when it is trapped between the short shells.
Shaping the head
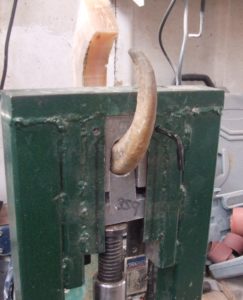
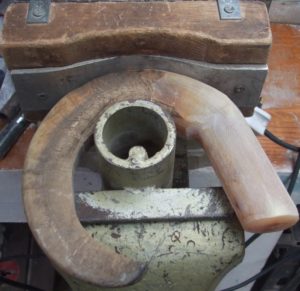
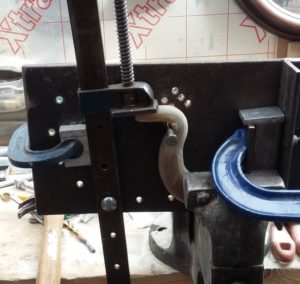
The next stage of creating our crook head is to form the basic shape of the head. This is done by heating the curved section of the horn and placing it in a jig which has a selected former in the centre, and the horn pressed against the former by bolts or clamps.
Here the horn can be seen in the forming jig. Heated and clamped in place it is left to cool and take on the shape of the former and only removed the following day. However, if you are in a hurry to proceed to the next stage it could be cooled by immersion in water and left for a while.
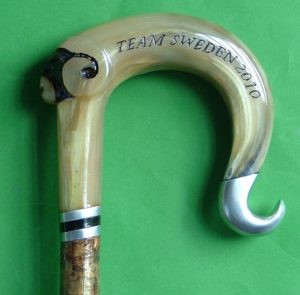
Forming the nose
We are now well on the way to creating our crook. Once removed from the forming jig we need to attend to the nose. That is the narrow pointy end of the horn. This needs to be heated and flattened between some plates so that it resembles a wedge. It needs to be cleaned up and brought into a balanced shape so that the next operation is not spoilt by an imbalance in the shape of the wedge shape. This description is for that of a plain crook with an out-turned nose, as opposed to having a plain nose in a market stick, or that of a crook with a carved nose on which the maker may carve a sheep dog, thistle, fish or any other decoration which has meaning to the maker or owner.
There was a time in the dark mists of my early stickmaking when I turned a nose using a pair of jaw locking pliers and I could never really master the technique without breaking the nose off or damaging the horn. There were Master stickmakers who used no other method and as far as I know did not suffer the failures that I did. However one of these Masters was not averse to new ideas and for making life easier and simpler for us lower mortals. That person was one Dafydd Davies, an excellent stickmaker from South Wales. He devised a steel plate with a series of holes drilled in an arc, which allowed a sash clamp to be used in conjunction with a steel pin, to allow the nose to be turned without difficulty or waste. I have two of these jigs and would never use anything else.
The sash clamp is placed on the end of the straight nose, heated on what is the outer radius of the horn and the clamp pulls the nose down. As travel on the clamps runs out it is moved to a new position and the process repeated as many times as need to acquire a nice out-turned nose. Again the horn is left to cool. If the nose cannot be closed as required then it can be put between vice jaws, heated and just closed up a little to your satisfaction.

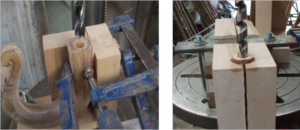
Drilling the neck
At this stage it is worth drilling the neck with a hole to take a dowel which will connect the head to the stick. This dowel also allows the horn to be held in a vice and rotated or moved into positions that allow easy working of the horn. With the dowel in place, a hazel stick can be chosen and after drilling a corresponding hole in the end of the hazel it can be offered up to the horn head and the horn then worked so that hazel and horn have the same diameter and match nicely across the joint.
For a plain joint this is all that is needed. Many use threaded steel bar which may then be strong but imparts weight to the stick and the last thing a shepherd needs is to carry a heavy stick around all day. The other problem with using steel bars is that they easily break through the side of the hazel when undue pressure is placed on the stick. Beech dowel can be made at home, on a lathe or just filed by hand; it’s strong and light and if the stick breaks it is very easy to drill the dowel out of the handle and replace it with new, a steel rod is a pain to remove from a broken stick. Of course this is only my opinion and many may disagree.
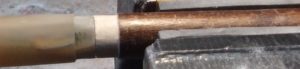
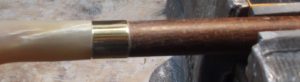
Fitting the collar
If the stick is to have a collar then there needs to be some material removed so that you have a nice fit and, if you are lucky and the bought in collar matches the diameter of the stick, you can have a nice unbroken line along the stick through to the handle.
Straightening the stick
Before the hazel stick is drilled out for the dowel you will most likely have to straighten the stick. Whether you bought the stick in or cut it yourself twelve months earlier, the odds are that it will not be straight, and nothing spoils a good handle like a poorly finished and bent stick. Like the horn the hazel will respond to heat and once heated bends can be moved and straightened. It can be a frustrating procedure for as one bend has been dealt with another seems to appear. This is because bends are not always in one plane but can be complex or compound bends, meaning that the wood is arcing in a complex manner.
Various methods are used to straighten stick. For the stickmaker a hot air gun is good enough, while commercial makers will use steam ovens to soften the stick. Once soft, the stick can be placed between two pieces of wood, where one side is concave and the other convex. As pressure is exerted on the stick, the concave side pushes against the bend and hopefully straightens it. There are also planks with notches of different widths cut into them so that the stick can be placed into the notch and bent against a notch edge – just a plain wood jig with two supports one side and one on the other which exerts pressure on the offending bend.
Fitting the ferrule
One last item to finish the stick off and that is fitting a ferrule to the end of the stick to protect it on hard surfaces. One thing has to be said regarding ferrules and that is that if a shepherd is to use your crook then you must make sure that the ferrule fitted is not proud of the stick. This is because if the shepherd is holding the crook by the stick end with the intention of stopping a sheep, and the sheep takes off pulling the stick through the shepherds hand, a proud ferrule is likely to open up the shepherds hand on the sharp pressed steel sides.
Summary
So by now we have pretty well covered a plain ram’s horn crook in the making. This is not the only way a crook could be made, but it is the way I have learnt and adapted what I have been shown. It takes year of practice to work ram’s horn, especially the larger horns like Scottish Blackface and Lonk. There is less work in the Welsh Mountain horns, but they do not allow for any carving on the whole due to size and bulk. In the end, the horn you are likely to be able to acquire will likely reflect the popular sheep breeds in your region. One thing is for sure, that no matter how much you think you know about horn it will always throw up a surprise when you are working with it.
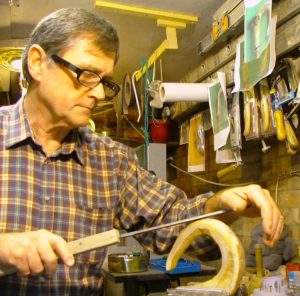
You can find more information about stickmaking, sticks and crooks in our topic introduction. All images above are the author’s own, with further examples of work available to purchase at Wren Country Sticks.
The views expressed in our blog are those of the author and not necessarily lowimpact.org's
10 Comments
-
1Jim cameron March 12th, 2020
I thank you for a very informative article I have just begun to look at making my own stick and am ok with wood working tools but am a bit lost as to the dimension of the handle /neck sizes and therefore even the shell sizes
And press sizes I am looking to get a local blacksmith to make these for me so any help/info would really be helpful
jimCameron
-
2Mrs L Bickerton January 21st, 2021
Love your articles and wondered if you can advise on what paint to use on horn, my husband has made a trout from rams horn and wanting to finish it, hopefully with your help. ?
-
3Dave Darby February 2nd, 2021
Mrs Bickerton
If you don’t get a response here, you could post your query on the stickmaking topic page and I’ll get a specialist to answer it for you.
https://www.lowimpact.org/lowimpact-topic/sticks-crook-making/
thanks
-
4Michael Gregson April 14th, 2021
Joe Musialowski, Where can I get the bulking shells from, are they made for you or do you utilise something else. what would you expect to pay to have them made.
-
5Joe Musialowski April 23rd, 2021
Michael Gregson. The only place I have seen bulking blocks for sale is ebay.
-
6Joe Musialowski April 24th, 2021
Hi Michael Gregson. The only place I seen blocks for sale is ebay. So just keep checking the site. The other thing you could do is join the British Stick Makers Guild and watch their magazine for adverts.
-
7Joe Musialowski April 24th, 2021
Mrs Bickerton. I would say use any hard wearing paint that will not wear out with handling. I use a modelers paint by Revell , Aqua Color. Can be bought art any hobby shop.
-
8Joe Musialowski April 24th, 2021
Jim Cameron. The best advice I have for you Jim is to join the British Stick Makers Guild and find a club local to you, thats where you will find so much information and see it in use. If there are no clubs near you then search for a country fair where the sticks makers run a competition and approach them. For your blocks search ebay , you will find well made blocks for sale there sometimes. for the press make the plates big 12 x 12 inches so you can get a big horn under the plates. To estimate handle sizes copy photos off the internet and use the size of the shank at 1 inch as a guide to the size of the head. You can use your printer to make the print larger or smaller. No matter what folk say there are no set rules for the size of your handle. You will find tell you a crook should be able to take a mans hand. But which man, we all have different size hands. Horses for courses.
-
9Norman April 7th, 2023
No one ever mentions that heating a collar to expand it would make a much tighter fit and therefore a stronger supported joint.
I wondered why this is the case
-
10Mick February 20th, 2024
Where can I get the jig and bulling blocks
 The sheep shearing season: an interview and photo story
 Why I walk: a conversation with a walking guide
 How to make a walking staff in three easy steps
 One man and his sticks: meet stickmaker Joe Musialowski
 Sticks & crooks


