How I built a Raspberry Pi Space Invaders arcade machine with my kids


This describes how my kids and I built an arcade machine, based on a Raspberry Pi. So, the first question many of you will be asking is….
Why?
Well, number one – Raspberry Pi machines are cheap (£30), non-corporate, mini computers that run Linux and will make a good second computer for children (for example), a media player in another room, or a data server. It might save people buying another laptop and it means you can reuse the peripherals of older PCs (screen, mouse etc). More here.
Secondly, children need to learn to code. There is no way this isn’t going to be a useful (and possibly essential) skill in the future. Laptops are great but don’t lend themselves to tinkering in the way a Raspberry Pi does. There’s a curiosity factor, plus the fact that if you really mess up, it’s easy just to wipe the memory card that functions as a hard drive & start again with a fresh version.
An arcade machine is a good way of introducing a Pi in an interesting way. The first arcade machines had blocky graphics but were simple to write code for, and have become retro chic for the next generation. Our arcade machine runs on the normal version of Raspbian (the main operating system for the Raspberry Pi), playing games using software like Scratch, Python & Processing.
Ingredients
The frame was made from scrap and recycled bits, such as a repurposed speaker from an old radio, or an old phone charger to power the Pi. You will need:
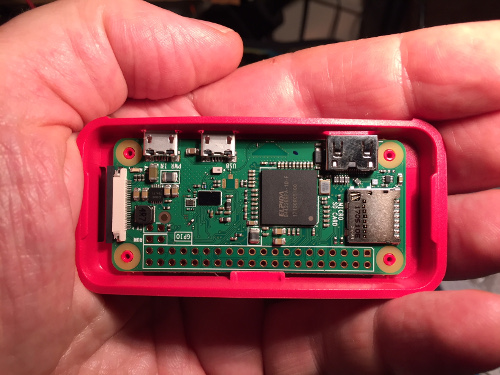
- A Pi3 (the latest as of end 2017) is the quickest model. The Pi zero is cheaper but slower, but a wifi version is now available.
- A power supply (rated at least 2 amps, ideally 2.5), USB / wireless keyboard and mouse.
- This makes connecting with speakers, joystick & buttons easy.
- An old computer screen is perfect for this, or a posh new HDMI 8″ screen is about £40. If the screen connector is VGA (an older type of graphics interface), you’ll need a VGA to HDMI connector.
- One or two small (4Ω ) speakers can be driven by the Picade hat, or take the Pi headphone output and plug into your stereo.
- A digital joystick such as this one.
- Proper arcade buttons are cool.
- Softwood plank offcuts, plus some plywood for the panels.
- Paint, wire, screws, angle brackets to hold the screen in place.
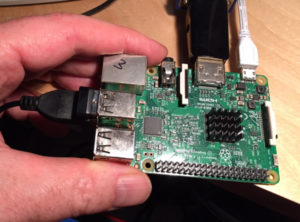
Raspberry Pi
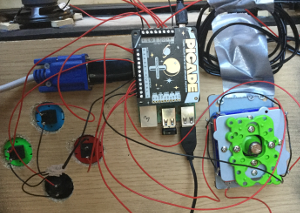
The Pi has a lots of ’GPIO’ pins sticking out, which let it interface with the rest of the world, by reading switches and sensors, and turning on LEDs and all sorts of things. Software lets you easily read the state of these pins if they are set as inputs, so a program could look and see if a button connected to an individual pin is pressed. This opens all sorts of possibilities, as the program can then make a character jump in a game, or start playing music, send a tweet … whatever you can think of. Connecting joysticks and buttons makes gaming more physical – a keyboard works, but it’s not got the feel of the real thing.
Building the frame
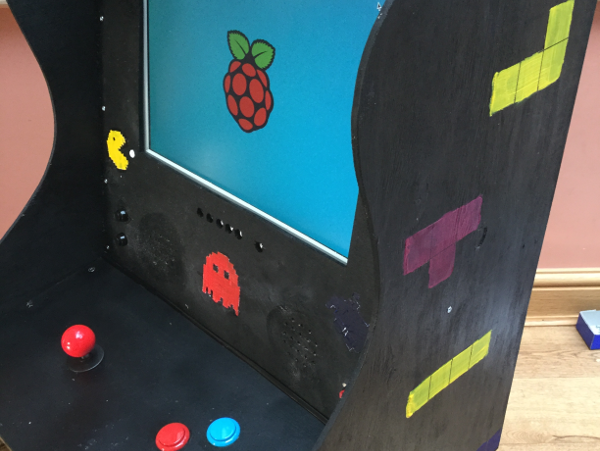
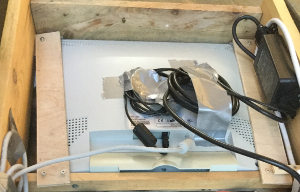
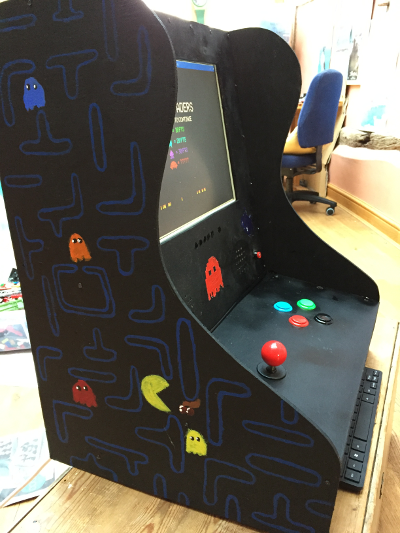
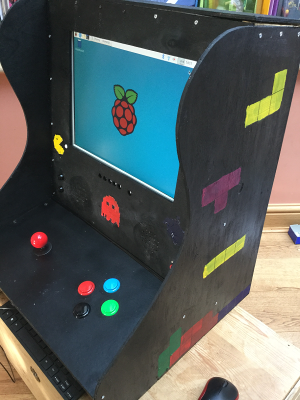
We used an old 14″ monitor screen rescued from an old work computer. Luckily this unscrewed from the stand, leaving just the screen, power adaptor and VGA cable. The screen size determined the width of the case and the height of the panel. Two sides, made of softwood, are held together by a forward sloping shelf holding the controls and a top plank. Cutting the sides creatively gives the screen and controls a slight angle which is more comfortable to play on. Long screws joining them is strong enough for our purposes. Your measurements will probably vary depending on the size of screen you are using, but the shape is about right. These are the only bits that need to be strong, the rest was made out of offcuts of marine ply that once packed something.
Panel
Cut a rectangle out of the front panel, the size of the viewable part of the screen. Drilling holes along the inside edge of the hole until you can get a saw in works if you don’t have a jigsaw. Angle brackets and a couple of bits of scrap wood behind the screen hold it up against the back of the front panel. The power supplies for screen and Pi were connected to a 2 socket extension lead which was fixed to the inside of one side, the adaptor held down via bits of strapping.
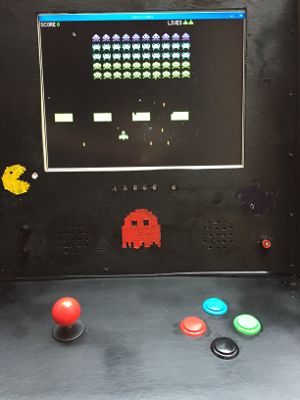
Small holes drilled in 2 circles at the bottom of the screen allow sound from the speakers through. They were fixed by screws into bits of scrap glued to the back of the marine ply, as it was too thin to screw into, but the alternative would just to have been to use bolts from the front. A couple of buttons ended up on the front panel too. A ply back panel & side panels completed it, painted with retro 8-bit graphics from old arcade games. A gap in the top helps to ventilate the screen and also provides somewhere to grip when moving it.
Picade
To make life easier we used a Picade Arcade Hat, available from pimoroni.com. This sits on top of the Pi’s GPIO pins and makes connections a bit easier. It has screw terminals for the joystick & 6 buttons, as well as some more utility buttons for things like the ’escape’ and ’enter’ keys, and a soft power switch. This needs pressing to turn the Pi on, and holding for 3 seconds turns the Pi off again – handy if you’re not using a keyboard. A wireless mouse & keyboard, if you have one, makes things easier to set up.
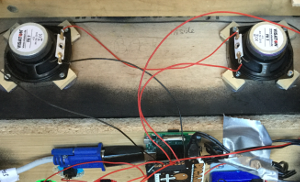
The Picade also has a little amp to drive speakers. We put a couple of 3 inch speakers behind the front panel. Wire more than one in series not parallel – ie wire from speaker + on the picade, to + on 1st speaker, the – of 1st speaker goes to + of 2nd speaker, and the – from 2nd speaker back to the – speaker terminal on the Picade. This stops it overloading the amp. Holes for the joystick and buttons were drilled in the lower flat shelf. The buttons are 27mm across, which isn’t an easy size to find a drill bit for, but using a smaller bit and a rasp opened the holes until the buttons fitted. Utility buttons went into the front panel as these aren’t pressed as often or as frantically during a game.
Connecting it up
The joystick also came from Pimoroni. Joysticks can be digital or analog – analog ones show how hard the joystick is pressed, but need more work to interpret, so digital ones are easier to use. The joystick has 4 switches, 1 for each direction, activated when it is pushed. Each switch has 2 terminals, 1 connects to the Picade, and the 2nd one of each (doesn’t matter which is which) are joined together and connected to ground on the Picade. Similarly the button terminals connect to the Picade and a shared ground.
The Pi and Picade sat under the shelf between the joystick and buttons. The screen was connected via a VGA to HDMI adaptor (only needed if your screen doesn’t have HDMI) and all was held in place with small screws. The Pi is now powered via the micro USB power connector on the Picade, but be warned, it won’t boot until you have the power switch wired up. If you haven’t got the ’NOOBS’ operating system with your Pi, you can download it from raspberrypi.org/downloads/raspbian & write it onto a microSD card. The alternative is to download RetroPie, which just does old arcade games, but misses out on Scratch and being able to do other things with your Pi.
Key bindings
The Picade’s main job is to take button presses and mimic keyboard key presses, as this makes it much easier to access these in software, and you can still test a game with a normal keyboard. The joystick maps onto the up / down / left / right arrows, but the other buttons mimic some less helpful keys like LEFT CONTROL and LEFT SHIFT, which software like Scratch can’t access. Connecting the buttons to inputs 6, ’coin’, 3 and 5 mimics pressing ’x’, ’c’, ’space’ and ’z’ which are easier to code within games. The ’coin’ button is marked ’1/4’ and is in the utility section. You can remap the buttons via the Picade but it’s not straightforward.
Turning it on
It took a weekend of tinkering, drilling and painting to get to this stage. You should now have power connected to the screen and Picade, the screen and Pi connected, and buttons, joystick and speakers connected to the Picade. Press the power button to turn the Pi on. If nothing happens, double check the wiring, take off the Picade hat, connect power directly to the Pi & check that works, and look at the Picade help. All being well, you will boot to the desktop.
Copy this into the terminal to set up the Picade:
curl -sS https://get.pimoroni.com/picadehat | bash
You should then be able to load up, for example, Scratch 2, which will respond to the joystick and buttons as though the arrow or x / c / space / z keys had been pressed. Python and Processing run games faster, and there are lots available to download and hack yourself at inventwithpython.com and openprocessing.org.
If any of this needs a bit more explaining, pop a comment below.
Cheers, Simon.
The views expressed in our blog are those of the author and not necessarily lowimpact.org's
6 Comments
-
1Hywel Cooper January 28th, 2018
What a beauty Si. Let me know when you’ve got Arcadian running. Hywel
-
2screenbeetle January 29th, 2018
Great idea, great article – thank you.
-
3Blair April 21st, 2019
Hi, where is the ROM for Space invaders from?
-
4Simon Lennane April 21st, 2019
@Blair Pygame has all sorts of interesting games which will run happily on a Pi. Easy to modify as well if you want to. https://github.com/leerob/Space_Invaders is the one I used.
https://www.pygame.org/project/1259 looks similar.
Good luck! Simon
-
5Simon Lennane April 21st, 2019
Pygame has all sorts of interesting games to play with.
This looks like the one I used: https://github.com/leerob/Space_Invaders
Pygame is here: https://www.pygame.org/project/1259
Good luck, Simon
-
6William Waldman April 9th, 2022
Hi Simon!
I might be late to the party – but I’d love to know how you overcame the issue you mentioned:
“You can remap the buttons via the Picade but it’s not straightforward.”
I’m trying to get my programming class (Connecticut, USA) to create Scratch games for the PiCade, prototyping them in Scratch on their own computers. End of year activity: Showing off the games to the student body, letting everyone in the school play them and vote for the best one!
Any advise on how to remap these keybindings to Scratch-friendly keys?
Thanks!
BTW – I realize that this project may be well in the rearview mirror now, but for anyone that might find it useful, a Scratch user named Griffpatch has an unbelievably great series on creating platform games in Scratch, on Youtube. Just search for his username there, or in the Scratch website.
Bill Waldman, Upper School Computer Sci Instructor, King School CT US
 Low-impact & the city 8: how to test drive Linux from a datastick, but keep Windows for the time being
 £30, credit-card-sized, non-corporate, low-energy computers set up to run Linux; any boxes not ticked there?
 So long, Doris: how to make a Linux computer from scratch
 Low-impact & the city 5: if a non-techie like me can switch to open source, so can you
 Copyleft
 Downshifting
 Free & open source software
 Low-impact homes
 Low-impact IT
 Low-impact kids
 Low-impact shopping
 Commons economy


