The Mushroom Guide Part 5: inoculating fruiting substrate


Inoculating fruiting substrate: sounds a little daunting, no? Fear not – Benedict Noel explains all in Part 5 of his Mushroom Guide for beginners keen to grow their own shiitake mushrooms.
Get up to speed with the rest of the series: see Part 1, 2, 3 and (critically) 4 first.
With the preparations almost complete, I sterilise the bags for at least 90 minutes at 15 PSI, but I generally do it for 2 hours and rarely get any contamination. I usually sterilise the bags in the evening and allow them to cool overnight to inoculate the next day.
Moving bags to spawn area
After your bags have cooled, you’ll need to transfer them to a sterile work area to add spawn to them. For many years, I used a still air box to do this, but if you’re going to step up production, you should look into buying or constructing a laminar flow hood.
Creating a still air box (or glove box)
A still airbox (SAB) is a large container with two holes in it to put your arms through. They’re easy to make. The easiest way to do this is to buy a large plastic storage container from a hardware store and then use a hole-saw attachment on a drill to make two holes for your arms to go through. You want the holes to be big enough to get your arms through and manoeuvre around a bit, but no bigger. The air all around you is full of bacteria and competitor fungi spores. The goal of the still airbox is to create a work area where airflow is restricted so that a minimal number of these contaminants can get in.
Try to find a container made of very clear plastic, the cheap ones are clear but slightly opaque and it makes it harder to see through them, especially when it gets humid. The really clear ones will probably cost you about $20-$25 AUD (between £10 and £13) for an 80L container.

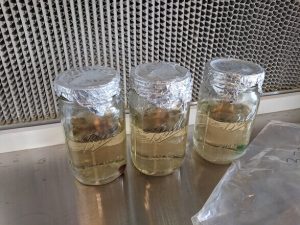
Inoculating bags
If you’re inoculating in a still air box, I find that doing 3 bags at a time allows you enough room to manoeuvre and also fill the bags with spawn. The small bags are a good size if you’re using a SAB; if you’re doing big bags it’s a pain to open the bags and tilt them enough to tip some grain spawn in because you have limited space. When working in a SAB, I prefer spawn in pint sized jars; quart jars are a little too big and it’s really hard to tip the last bit of spawn out into a bag. One pint jar of spawn can easily do 6 bags, try to pour an approximately equal amount of spawn into each bag.
Once you’ve poured in the spawn, you can seal the bags with either an impulse sealer, or you can very carefully seal them using paper clips or alligator clips. With paperclips, try to get the gussets on the side of the bag as flush as possible and then do at least 3 small folds from the top of the bag downwards, each fold a couple of centimetres in length. Hold the fold with one hand while putting the paperclip on one side of the bag and then put another two paper clips over the folds, then one over the other side of the bag followed by one in the middle of the bag.
If you’re using an impulse sealer you’ll probably need to get the bags out the SAB to seal them. I still use paperclips when I do this: I’ll do a single fold of the bag, put on 2 paper clips and then bring it over to my impulse sealer to seal it properly and then remove the paper clips. To make sure the bag is sealed properly give it a gently squeeze and make sure it doesn’t deflate. If it deflates, find the hole and re-seal.
Colonisation
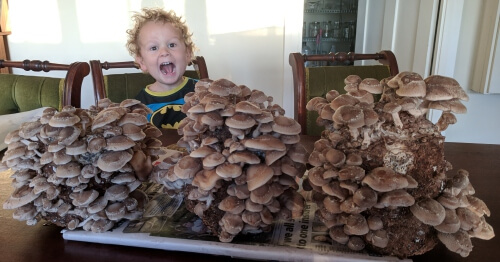
Typically, shiitake take 8-12 weeks to fully colonise and then turn brown. Shiitake are unique in this aspect, most other types of mushroom are considered fully colonised when they’re completely white but shiitake will slowly start to turn brown and form small bumps. Once the block is mostly brown, it’s ready to be fruited.
It’s possible that your blocks will start fruiting prematurely, in which case you’ll see mushrooms forming under the plastic while the block is still white. If the bag isn’t very brown, I leave the mushrooms in there until it gets browner and then rip these premature mushrooms off when I open the bag. If the block is mostly brown, I’ll wait until the mushrooms get to a size where they’re a few days away from harvest and then I’ll open the bag. These mushrooms will generally turn out okay. They’ll be a bit flattened from being squished in the bag but will still taste great.
Next time, we’ll move on to spawning.
Based on an original post available here by Benedict Noel at The Mushroom Guide.
 About the author
The Mushroom Guide is written by Benedict Noel from Perth, Western Australia. He’s been hooked on mushroom growing since watching this TED talk in 2015 and has been building his knowledge and experience ever since. Since starting out, he’s helped run a couple of cultivation courses, given presentations at festivals and grown a wide variety of mushrooms, from oyster and shiitake to pioppino and chestnut.
The views expressed in our blog are those of the author and not necessarily lowimpact.org's
 The Mushroom Guide Part 2: fruiting shiitake mushroom blocks
 The Mushroom Guide Part 3: harvesting shiitake mushroom blocks
 The Mushroom Guide Part 4: preparing fruiting substrate for shiitake mushrooms
 The Mushroom Guide Part 8: working with liquid mushroom cultures
 Low-impact food & drink
 Mushroom cultivation
 Urban / small space gardening


