Imagine this: outside, the wind is howling, but inside, a gentle warmth radiates from your wood burner. The air is filled not just with the comforting scent of woodsmoke, but with the rich, savoury aroma of a slow-cooked stew, simmering happily on the stove top. This isn’t a scene from a rustic cabin in a far-off wilderness. This can be your reality.
Calling all wood burner owners! Does yours have a flat top? Have you ever looked at that steady, reliable source of heat and wondered if it could do more? Perhaps you’re exploring a more low-impact life, want to save on energy bills, or simply wish to be prepared for the occasional power cut.
I’ve been cooking on my wood burner for over five years, and it has transformed my kitchen, my cooking, and my connection to food. It’s a return to something primal, a way to slow down and create meals with incredible depth and flavour.
Here are some tips to unlocking the magic of wood burner cookery. We’ll cover why it’s one of the most rewarding ways to cook, the practical steps to get you started safely, and what delicious creations you can begin with.
1. Why? Rediscovering the joy of fire-powered food
Before we get to the nuts and bolts, let’s talk about the soul of this practice. Why choose a wood burner over a conventional hob or oven? The benefits go far beyond simple utility.
A revolution in flavour
The secret to wood burner cookery is its philosophy: low and slow. The heat is gentle, consistent, and indirect, which works magic on food. Unlike the fierce, sometimes flavour-stripping heat of a gas hob, this method coaxes out taste. Vegetables, spices and herbs become impossibly vibrant. Dahls and veggie curries take on an authentic depth as the flavours have hours to concentrate and marry. The slow caramelization of sugars in root vegetables creates a deep, savoury umami taste that is simply out of reach for faster methods. I’ve even found we need less salt, because the food itself is just so much richer.
The thrifty and sustainable kitchen
In an age of soaring energy costs, your wood burner is a secret weapon for thrift. If the fire is already lit to warm your home, the energy for cooking is essentially free. This opens up a world of culinary possibilities. I regularly steam large potatoes on the burner for a few hours in the evening, pop them in the fridge, and then finish them in a hot oven or grill the next day for a fraction of the time and cost.
This method also champions budget-friendly ingredients. Larger, tougher cuts of meat like brisket, shin, or liver, often avoided because of the long cooking times they require, become your best friends. The slow, moist heat tenderizes them to perfection, turning them into fall-apart-tender pulled pork or a rich, hearty stew. It has given me the satisfaction of cooking with lovely food I once thought was beyond my reach.
A creative and mindful practice
Wood burner cooking encourages a beautiful connection with the seasons. In the summer, I’ll turn a glut of tomatoes, plums, or apples into pasta sauces and pie fillings, bottling or freezing them for the dark winter months. It’s a deeply satisfying way to reduce food waste and engage your creativity.
And if you’re tempted but nervous about kitchen mishaps, please don’t worry. The memory of dodgy cooking smells from my childhood no longer haunts me (I swear my grandmother put christmas Brussels sprouts on in November!). Any aromas from missteps on the stove top simply disappear up the flue, leaving only the welcome, homely waft of your carefully chosen dinner.
2. How? Getting started
Feeling inspired? Let’s get practical. Getting started is easier than you think, but it requires the right gear and a bit of knowledge.
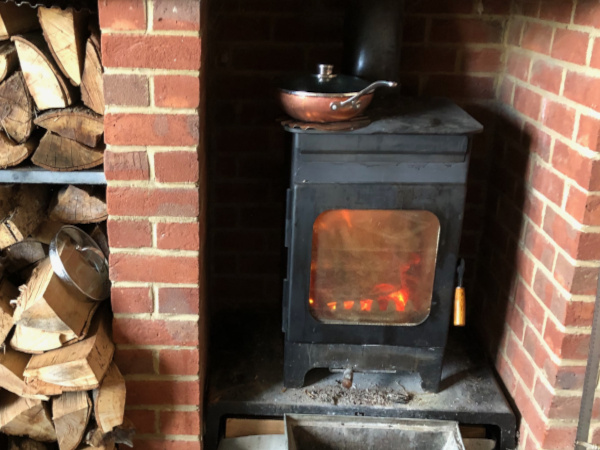
Is your stove ready for cooking?
The ideal cooking wood burner has a solid, flat top. Most cast-iron and steel stoves fit this description. Before you begin, ensure your stove is in good working order, clean, and has been serviced according to the manufacturer’s guidelines.
Essential gear: wood stove cooking kit
You don’t need a lot of fancy equipment, but investing in a few key pieces will make your life much easier.
- Dutch oven: This is the undisputed king of wood burner cookware. A heavy-bottomed, lidded cast-iron pot (enameled or plain) is perfect for retaining and distributing gentle heat. It’s your go-to for stews, soups, braises, and even baking.
- Cast-iron skillet: For griddling peppers, searing meat before a slow cook, or making a rustic frittata, a well-seasoned cast-iron skillet is invaluable.
- Trivet: This is a crucial tool for temperature control. A simple metal or cast-iron trivet (pot stand) allows you to raise your pot off the hottest part of the surface, turning a rolling boil into a gentle simmer.
- Good oven gloves: The entire surface of your stove is, of course, extremely hot. Invest in a pair of high-quality, long-cuffed oven gloves or welder’s gauntlets for safety.
- Long-handled utensils: Metal or wood spoons and ladles with long handles will allow you to stir and serve without getting too close to the heat.
Mastering the heat: the art of temperature control
Your stove top is not a uniform surface; it has heat zones. Learning to read them is the key to successful cooking.
- The hottest zone: This is typically directly above the main firebox. This spot is for bringing a pot to a boil quickly or getting a good sear on meat.
- The simmer zone: The areas towards the sides and back of the stove top will be cooler. This is where your pot will live for most of its slow-cooking journey.
- Controlling the fire: You can regulate the stove’s overall heat output by adjusting the air vents. More air means a hotter, faster-burning fire; less air means a cooler, slower burn.
- Using a trivet: As mentioned, placing a trivet under your pot is the easiest way to instantly reduce the heat and achieve a perfect, gentle simmer.
- The water test: A simple way to gauge temperature is to flick a tiny drop of water onto the surface. If it sizzles and evaporates instantly, it’s very hot. If it beads up and dances around for a moment before evaporating, it’s at a great medium-high heat for cooking.
Safety first: cooking without calamity
This is non-negotiable. Cooking on a wood burner is safe, but it demands respect.
- Clear the area: Keep flammable materials like tea towels, log baskets, and paper well away from the stove.
- Stable cookware: Ensure your pot or pan sits flat and stable on the surface.
- Handle with care: Always use your oven gloves when touching any part of the pot, including the lid.
- Beware of steam: When lifting the lid, tilt it away from you to let the hot steam escape in the other direction.
- Good ventilation: Your stove should already be properly installed with good ventilation, but ensure the room has some airflow.
- Never leave unattended: While slow cooking is a long process, never leave the house with food cooking on the stove. It’s fine to be in another room, but check on it regularly.
3. What? Your wood burner culinary journey
So, what should you make? The possibilities are nearly endless, but it’s best to start simple.
Your first dish: the perfect starter soup
I began with soup, and it remains the perfect starting point. It’s forgiving, hard to mess up, and deeply rewarding.
Basic Method: First, gently soften onions, garlic, carrots, and celery in a little oil on a hotter part of the stove. Next, add your main ingredients (lentils, root vegetables, etc.), cover with stock, and bring to a gentle boil. Finally, move the pot to a cooler “simmer zone,” put the lid on, and let it gently bubble away for a few hours until everything is tender and the flavours have melded.
Expanding your repertoire
Once you’re comfortable, the world is your oyster.
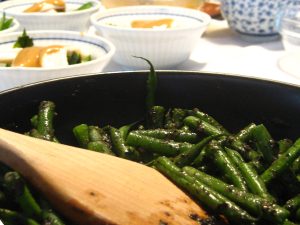
- Hearty braises and stews: The absolute best use for your burner. Think beef and ale stew, lamb shanks, or a rich chicken cacciatore.
- Grains and legumes: Cook perfect, creamy polenta or oatmeal. A pot of beans or lentils can simmer all day, ready for dinner.
- Delicate desserts: You can even make desserts! A creamy panna cotta or egg custard, cooked gently in a ‘bain-marie’ (a water bath), works like a dream because the low temperature prevents it from curdling. Baked apples stuffed with cinnamon and raisins are also a classic. See the bottom of the page for a recipe for caramelised pears with chocolate sauce.
- Stocks and broths: Don’t throw away vegetable scraps or chicken carcasses. Place them in a pot with water, cover, and let them simmer for hours to create a delicious, free stock.
4. The heart of the matter — building community through food
On a more serious note, wood burner cuisine tends to encourage bulk cooking. It’s hard to make soup for one this way! This offers a powerful and delicious opportunity to rebuild our fractured society. It is a potent reminder that sharing food and company is a basic human need.
This practice is so ancient it’s buried in our language; the word ‘companion’ literally means ‘one you share bread with.’ By coming together over shared meals, we nurture something essential. Ask any parent—the right to be fed and the instinct to provide food for others is fundamental to a life of meaningful loving connections.
My aim is to join with many more of you to keep our cooking not just low-impact on the environment, but high-impact on our emotional well-being and social connections. For the sheer joy of promoting and sharing delicious food. Together.
So, light your fire. Start with a simple soup. See how it feels to create something so nourishing with such a elemental force. Share a bowl with a friend. Let’s swap recipes and ideas, and grow a low-impact, high-community cooking movement—one delicious meal at a time.
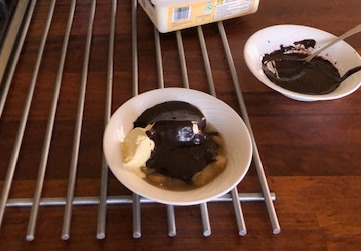
5. Recipe: caramelised pears with chocolate sauce
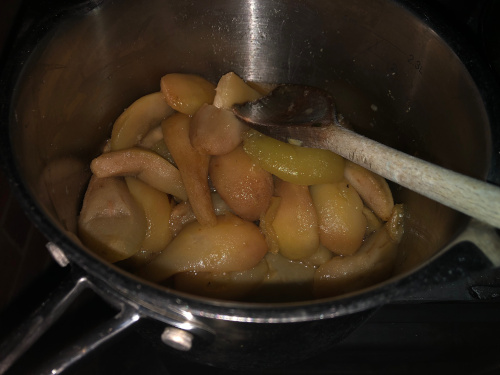
Some of the best recipes happen by accident, and this one is no exception. I left some pears cooking on the woodburner a little too long, and instead of a disaster, I discovered something magical. They had turned brown, gooey, and absolutely bursting with deep, caramelized flavor. At first, I thought they were ruined—until I dipped my finger in – mmmm… pure heaven!
This kind of flavour deserved a worthy companion. A quick and easy chocolate sauce did the trick, and with a dollop of vanilla ice cream, the whole thing became an indulgent, yet simple, celebration of local ingredients and low-impact cooking.
A note on quantities & cooking times
If you’re used to following recipes to the letter, this one might feel a little different. Low-impact cooking is not just about using what’s available rather than shopping for precise amounts. Significantly it’s also about reconnecting with local, seasonal food, being flexible, and enjoying the process rather than chasing perfection.
The good news? The flavours here are incredibly forgiving, so feel free to experiment! You’ll want more pears than you think—at least twice as many—because they reduce down into a delicious syrup. If you have a pear tree (or a generous neighbour with one), even better! If not, a farm shop or local market is a great way to support small-scale producers.
What you’ll need:
- Plenty of pears (at least twice as many as you think—trust me!)
- Chocolate sauce (see below)
- A scoop (or more) of vanilla ice cream
For the chocolate sauce:
- A knob of dairy butter or a dash of oil to prevent sticking
- Cocoa powder or dark chocolate
- A touch of syrup (maple, agave, or even treacle—totally optional, depending on how sweet you like it)
The method:
- Caramelizing the pears:
- Place your pears on the wood-burner and let them slowly soften and caramelize. There’s no rush here—slow cooking brings out the deep, syrupy flavours.
- Stir occasionally if they’re in a pan, but if you forget about them for a while (as I did), they’ll likely turn out even better!
- Making the chocolate sauce:
- Melt the butter or oil in a small pan over low heat.
- Stir in cocoa powder or chopped dark chocolate until smooth and glossy.
- If using syrup, add a drizzle to taste, stirring well.
- Remove from heat once fully melted and combined.
- Assembling Your dish:
- Smother the caramelized pears in warm chocolate sauce.
- Add a generous scoop of vanilla ice cream.
- Dig in and enjoy!
A note on aesthetics
In an Instagram-perfect world, food is often about appearances. But this is about something deeper: the joy of cooking with what’s available, the connection to your ingredients, and the satisfaction of using local produce well. Yes, the pears will turn brown—that’s part of the caramelization process. But once they’re covered in silky chocolate sauce and melting ice cream, no one will care what they look like!
Variations & ideas
- Try this with cherries or raspberries if they’re in season.
- Experiment with different syrups or natural sweeteners.
- If you make your own ice cream, you’re a superstar (mine was store-bought, and that’s fine too!).
I’d love to hear how you make this your own—what local twists would you add? Happy low-impact cooking!


2 Comments
Hi Julia
We bought a flat-topped woodburner many years ago because we wanted to be able to cook on it in case of a power cut. We have boiled kettles on it, but your article has inspired me to start cooking properly. The only trouble is that I have to wait until Winter!
On a general note, I find Low Impact and all you are doing in Stroud and elsewhere very inspiring, Thanks!
PS Maybe an article about Kotlich cooking?
Hi Sharon,
Delighted you’re inspired. Sympathies, the weather is still very warm. I had wondered about blogging on summer barbecue cooking actually. Home made local charcoal is becoming more available isn’t it. Thanks for the tip. I’ll check the Kotlich out.