See ‘making lime mortars‘ for how to make mortars, plasters and renders.
Plaster is usually used for interiors; renders for exteriors. But it’s basically the same stuff.
In Victorian times, plasterers would have produced lime putty in a pit, but builders would have produced a ‘hot’ mortar, by mixing quicklime with wet sand. The mix would have fizzed and popped, and must not have been very pleasant to work with (but they were only the working class, so they really didn’t matter very much in those days – and they weren’t too hot on health and safety), but it would have been quicker than slaking lime properly. Slaking was essential for making plasters though, as it had to be of a higher quality than mortars – you couldn’t have little craters appearing on the surface of the plaster.
Use one part lime putty to three parts sharp sand; it’s even more important to ensure that you use sharp sand and not smooth builders’ sand when making plasters / renders, as the sharp angles hold the plaster together and stop it falling apart. At Ty Mawr they have experimented with using ground recycled glass instead of sharp sand – with success.
Brush surfaces to be rendered, to remove any loose material.
Before plastering / rendering, you can fill any holes with lime mortar first.
Always wet surface first. Can spray with a weak limewash the day before – gives a good key.
Can add chopped straw to first coats of external renders (about a handful to a tub of render). Add straw or hair just before use. Don’t store renders or plasters with straw or hair already in as it will rot.
You can also add half a shovelful of cow manure to each tub of render (or mortar), as its stickiness will improve its binding properties.
In Romania, when they make lime renders, they traditionally add sugar and eggs as if making a cake, although no-one seemed to know exactly why they do it. Sugar increases the solubility of the lime, and so will help the lime to penetrate / adhere to porous surfaces. The eggs – who knows? Maybe they will decompose slowly and add CO2 and help carbonation.
Render can be applied by casting (needs a lot of practice), in other words throwing the render at the wall (from a trowel). Casting is good because when it dries it leaves little pinnacles in the render, which help to get rid of water. Water is drawn to the tip of these pinnacles and evaporates. Casting is also good for the first coat of interior plaster. Make the mix a bit wetter than normal. Lots will end up on the floor, but you can pick it up and use it again. It leaves a stippled surface which is a good key for further coats.
When the first coat not quite dry, score in a diamond pattern, as a key for the second coat.
Wet all coats before applying next one. Can use a garden spray, or a thick brush.
You can even use hydraulic lime with plasters if conditions are damp, but usually non-hydraulic is ideal for plasters and renders as it carbonates easily as all the lime is either exposed to the air or very close to the surface. Use hydraulic lime (a powder rather than a putty) like cement – mix with sand and water on a board.
It’s best to cover new renders and plasters with damp hessian or plastic sheets, to protect them both from drying out too quickly, and from rain.
It’s also best not to do outdoor rendering in winter, because if frost gets into a coat of plaster before it is dry, it can throw it off. Lime plasters / renders / slurries can take weeks to dry in cold weather, but will be dry next day in the summer.
When using lime plasters and renders (just maybe) don’t be over-concerned about smoothness or straight lines. This is controversial, but maybe we’ve become a bit too obsessed with perfection in our homes. A rougher texture or a bit of a curve can add interest, and indeed be attractive. This may work better in a natural home, or a rural building, rather than an urban semi, and potential buyers may not be as enamoured with ‘imperfections’ as you are. This probably has more to do with prevailing attitudes than personal taste though; dare to be different!
Two coats of render is adequate, although some people apply three.
The thinner the coat of plaster / render, the harder it will carbonate. You don’t need more than about 12mm (1/2 inch) of plaster on the first coat coat, and a maximum of 6mm (1/4 inch) on the final coat.
A more detailed description of the many different types of renders can be found in Holmes and Wingate’s Building with Lime, but for the domestic scale, and especially for a natural house, a standard render with non-hydraulic lime putty and sharp sand will do a good job.
You can experiment with frescoes – mix some pigment with water and paint onto wet plaster. Your design will then carbonate into the drying plaster.
Coarser sand can be used for a final coat of external render than for internal plaster, as not such a smooth surface is required outdoors, and a rougher texture will give slightly more surface area from which moisture can evaporate. So no silver sand required for external renders, even for the final coat.
Decoration: many stately homes have a wide range of decorative lime plasterwork, including cornices and castings, carried out by master craftsmen who were paid a pittance by the landed gentry in a (thankfully) bygone age. Obviously, when it comes to low-impact living, we don’t have a great deal of interest in this sort of thing. However, there are many vernacular traditions around the world where lime has been used to create beautiful decorations on ordinary houses, and you can give free rein to your artistic tendencies in moulding and carving interesting shapes to make your home beautiful and unique. You can make moulds (see Holmes and Wingate, Building with Lime), or you can carve shapes into the render before it has dried. You’ll have to plaster a bit more thickly if you want to have some relief on your patterns, and it would be a good idea to have a higher ratio of lime to sand – say 1:2 or even 1:1 for the final coat. You could also add a handful of hair to each tub to help hold the render together. This kind of freehand carving is called pargeting, and is common all over the world on traditional buildings.
You could also press sea-shells, coloured glass, pebbles, or other ornaments into the wet render; or even put a dark pigment into the final thin coat, then scratch it away to produce shapes or patterns of the lighter coloured render underneath.
Regularly check around the outside of your rendered building for damage. If any render has cracked or come away from the wall, it can easily be repaired. Unlike cement, lime putty will keep forever in a bucket (as long as there is a skin of water above it, and a lid to stop evaporation), and so you can knock up some render to do some quick repairs. You can also limewash the walls once a year, as whole villages used to do, and still do in parts of Romania, for example.
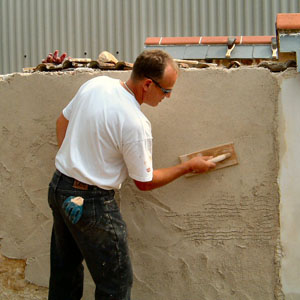
 lime rendering…. pic: Mike Wye |
 … and the finished job |
Calculating coverage
If you consider that a coat of render is around 1cm thick, then one tonne of render will cover 100m², which means 50m² for two coats, and remember that you’ll probably be plastering inside too.
One tonne of render is 3/4 sharp sand and 1/4 lime putty. 1/4 of a tonne is 250kg, which is 10 x 25kg tubs. You may want to mix your own render, in which case you could buy 10 tubs to make a tonne of render, or a tonne bag of putty to make 4 tonnes of render (you can also buy tonne bags of render ready-mixed).
Interior plastering
If you have some difficult plastering to do, for example onto a smooth surface, or timber, or especially ceilings, you can add battens, and then on top of the battens, laths (thin strips of wood). Plaster can then be applied onto the laths, and some will be pushed through, drop behind the lath, and hold the plaster on. These little overhangs of plaster are called nibs.
 lime plaster pushed through laths pic: Mike Wye |
Laths are around one inch (25mm) wide and 1/4 inch (6mm) thick. You can soak them in limewash first, which will slow down the drying out, and improve adhesion.
Laths are traditionally chestnut. They come in either 3ft (910mm) or 6ft (1.82m) bundles of 60. Larch laths can be found for almost a third of the price. It’s much cheaper to try and plaster directly onto the wall if at all possible, or think about using a slurry or a wash instead. Don’t forget to damp the laths down, as with anything you apply lime render or plaster to.
Cheaper options for laths are galvanized expanded metal laths that are sold in 8ft x 2ft (2.5m x 600mm) sheets; or reeds.
When battening the walls, if the walls (or ceiling) are damp, you can put a pieces of slate between the battens and the walls. Use galvanized nails to fix the laths to the battens.
When plastering over laths, move the trowel diagonally, not up and down, which will push the plaster right through.
You can’t use lime plaster over plasterboard, as there will be too much suction, and the plaster will fall off.
Don’t use lime plaster to repair gypsum plaster either, as gypsum is neither breathable nor flexible.
You can add hair (horse, cow, goat etc) to both coats of interior plaster as a tie. It will bind the plaster together, and prevent cracking. Tease it in as you mix the plaster (don’t throw it in all at once, as it will end up in a ball and not spread evenly throught the mix) – use one handful per bucket of plaster.
Apply two or three coats of plaster. Two is enough unless you’re really fussy. Score diamond shapes into the plaster as a key for the next coat. Leave each coat as long as possible before applying the next one – a week if possible. Spray the walls a couple of times a day, and brush with a stiff brush to prevent the surface from becoming too smooth.
There is no definitive way to apply plaster – experiment to find the best method for you. It does have to be pressed hard though, to make sure it sticks properly; so shortening your plastering trowel might be a good idea, to reduce its area, and allow more pressure to be applied. Simply cut an inch (25mm) off each end with an angle grinder or hacksaw.
Top coats shouldn’t be more than 5mm thick, preferably around 3mm. First coats can be 6-9mm. You don’t really need more than this.
The final coat of interior plaster can be 1 part lime putty to 2 parts sand. You can use very fine sharp sand for the final coat – e.g. silver sand, available at builders’ merchants.
Some books suggest using some gypsum in the mix for the final coat, as it sets quickly and helps to avoid cracking. However, it will reduce breathability and flexibility, and it doesn’t take CO2 from the atmosphere to set – so from an environmental point of view, don’t bother.
When making your own plaster – especially for the final coat – the longer the lime putty has been stored the better, as this will ensure that all the quicklime has slaked, and none is going to slake on the wall, causing little pock marks.
With lime, wooden floats are better. NB: floats are made from wood or plastic, trowels are made from metal. Use a big circular motion, but don’t overdo it.
To get a large area flat – screw battens to the wall, then level off the plaster with a large piece of wood, moving it from side to side over the battens. Then take the battens off and fill in where they’ve been.
Don’t overwork the plaster, as it will draw lime to the surface, producing a hard crust with softer lime underneath. It will also make the surface too smooth, which will provide a bad key for limewash.
 cob barn before…. pic: Mike Wye |
 … and after rendering |