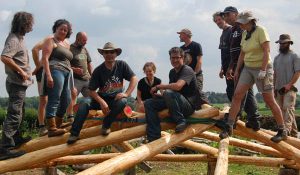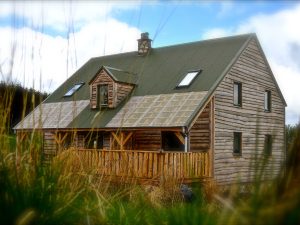
When I built our timber framed classroom last year, one of the concerns was how best to heat it. We are entirely reliant on woodfuel here, and a regular woodburner was going to make a big dent in our precious wood pile. Then I saw a rocket mass heater in Permaculture Magazine, and it seemed the perfect solution. First it burns small fuel, which that we typically don’t use in our range cooker. Secondly, it burns very efficiently and thus cleanly, so less fuel is required. We were a little sceptical about the claims made for RMH’s, especially the cleanliness of the exhaust and the temperatures that could be reached inside the burner, but were intrigued and decided to attempt to build one. Something that requires a 20 foot horizontal flue, heat retaining bench, and 50 gallon steel drum needs to be designed as part of a building, and so it was here, the base of the heater being built at the same time as the foundations of the building itself.
Although the basic design of the RMH is a relatively simple one, the devil is in the detail, and after reading as much as possible on the subject, we got ourselves a copy of Ianto Evans excellent book ‘Rocket Mass Heaters’, and followed the dimensions as closely as possible – some of the proportions within a RMH need to be within quite small tolerances to work effectively, and the majority of those builders with problems seemed to be suffering because they had changed some element of the design. Some of the materials – brick, clay, and steel barrel, were easy enough to come by at no cost; the 8” spiral duct, firebrick and insulated flue had to be purchased, bringing the total cost to approximately £200. Normally we have great success in finding materials for nothing, but the firebrick and the sheer quantity of flue required for the mass eluded us this time.
Initially all the parts were laid out to get an idea of scale, and then the base for the fire built up. We used a layer of glass bottles as an experimental insulation layer, with sand over, then paving slabs, set perfectly level. On top of this we were able to dry build the combustion chamber itself, and have a test fire before dismantling, and then rebuilding with clay mortar. At this stage the drum was set on and a full test firing carried out to ensure that the flue drew properly before burying everything in cob mix. Having mixed and laid a couple of tonnes of cob, it seemed that something had gone terribly wrong, as the excellent draught we’d seen seemed to have vanished, but persistence paid off, and as the cob dried out, and the fire put less effort into driving out moisture and more into heating the mass, things improved and we’re happy (and relieved) to report that all it now works.
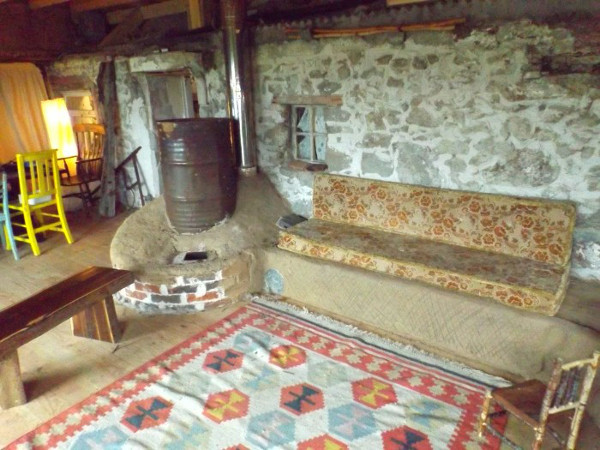
It needs to be used little and often to maintain heat in the mass, but once charged up it keeps a big space comfortably warm, and people and pets fight to get a spot on the warm bench. We are getting to know our heater and its little foibles now – lighting it from cold, or on a still day can be a challenge, and until it warms up it has the occasional cough back into the room, but persevere a little and it goes very well. It’s definitely one of those things that fascinates visitors, although the 50 gallon drum isn’t for everyone, and we’ve had many suggestions for ‘improving’ the look of it. Other than that it is a huge hit, and incredibly successful.
Here’s how it was built.
Now that we’ve the outside of the build done, we are turning our attention to the rocket mass heater that is going to keep the space warm. For those who haven’t encountered one before, the rocket mass heater (RMH) is a well proven though not widely used way to burn wood very efficiently, and then capture all the heat produced, in a mass – normally a bench or bed – by passing the flue horizontally through it. Rather than explain all the intricacies, please do visit this excellent site to find out more.

Anyhow, above you can see the outer brick surround of our heater – the bricks were unwanted surplus, and we’ve used lime mortar to build with. This wall contains the flue, which will be encased in a large amount of cob, and the brick will be clay plastered too. The burner will live at the near end. We’re building it before the floor goes in to make life easier.

Just to make sure that the thing really will work, I fired it up ‘dry’ – that is with the burner built up out of firebrick, but with no cement in the joints, or around the flue. Sure enough it burned happily once I got it lit, and seems to draw well enough. Having done that, the burner has been dismantled, and the flue set up now that we know what goes where.

Here’s the far end of the flue, where it turns through 180 degrees and heads back again where it will exit vertically. These two caps will be removable to allow the flue to be cleaned, and will be hidden in the end of the bench.

The flue is 8″ and there’s a lot of it…

So at the back, you can see two openings – the left one will be a cleanout with a cap on it, the next one is where the vertical triple wall flue comes off and exits through the roof. The one in the middle is where the exhaust from the burner enters the flue, and the one on the right is yet another cleanout.

Having tried (and failed) to get clay soil cleaned up enough to make smooth clay mortar, I just went out and bought some clean clay, which was thirty quid well spent, and allowed the burner for the rocket mass heater to get built. Several of you will be wondering what on earth we are conjuring up here, and once again, to save lots of explanation, have a look here.

The ducting is all properly jointed and sealed now, and here you can see the burner built up as far as the top of the fuel feed (right) and the bottom of the riser (left). Building with firebrick and very smooth clay mortar means the joints are very small – down near 1/16″ to keep as much heat in as possible and the fire super efficient.

Here’s the heat riser built up completely, and although the outside looks rough, the inside is all cleaned flush, and super smooth. The next job is to cobble together a metal cylinder to surround the riser and contain some insulation, and mix a load of cob to fill in the void around the burner, and give the outer barrel something to sit on.

Then we pushed on, built a brick support around the base of the firebrick burner, – above, and then backfilled all the gaps with perlite and a clay mix to thoroughly insulate the fire itself, which we want to burn as hot as possible. The clay mix is a little hit and miss, but is roughly 1 part clay to 4 parts sand. For areas around the burner we’ve stuck to using the clean clay bought from a pottery supplier. For everything else, it will be the locally dug clay, at around 1 sand: 3 or 4 clay. No straw in the bits immediately adjacent to the pipework, apparently, though its a bit late for that in one or two spots.


The next step was to surround the firebrick riser with a metal cylinder (an old water tank in this case) which was again filled with perlite insulation and capped with clay. Over the top of this goes the 50 gallon drum, leaving a 2 inch gap around between it and the inner riser. This is then connected to the horizontal flue by means of a variety of bits of firebrick and more cob.

Having got all this together, and dropped on the top part of the insulated flue, it was time for the moment of truth. Rocket Mass Heaters aren’t known for easy lighting, as until they get warm, there’s a tendency for smoke to blow back up the fuel feed. Other than a bit of initial smoke, it went really well, especially considering that it is trying to dry out a load of clay mortar along its way. The barrel got nice and hot, while the insulated flue stayed cool, and the exhaust really was a little smoke, and mostly warm steam, just like I’ve seen in countless videos. I don’t know why, but I’m still surprised it actually works..