Many years ago now, we heard a radio report on a guy who had converted his own pedal-powered washing machine. We both decided that once our own electrically-powered machine developed an irreparable fault, we would convert it. In fact this is what we have been doing systematically with all our electrical appliances, as they breakdown. We divide them into unnecessary, (the case of the hair-dryer is a good example of this, its only function being an extra aid to heat up cold baby pigeons) or we convert them to human-powered. The following appliance has now been running manually (or rather, by being pedalled), for over four years and we would recommend the conversion to anyone who wants clean clothes, healthy exercise, a well watered flowerbed and help in getting off the grid.
Please note in this simplified version of our pedal-powered machine there is some welding involved, both for the pinion and the bicycle supports. However, in Part Two, (the modified version), the transmission layout does not require any welding and the bike supports could of course be fabricated from timber. In effect, the modified version worked better but all of the steps needed to complete the project, excepting the transmission, are contained within the following. I also wanted to show how I developed the idea, I think it is a useful exercise both for myself and to share with others that I show how the design process works. In the event, with this first version I got the feel for the effect of a full washing load versus the effort required to pedal.
Note 2 – I have recently completed a ‘new’ pedal-powered washing machine as this one finally sprung a leak after years of great service. The new one is a top loader and also has wooden stands. Due to requests from subscribers, I am writing this project up in step-by-step detail. There are also tips on removing and recuperating materials and complete photographic documentation of each step in the conversion. The first in this series of what will probably comprise 5 articles with their respective films has just been published and is available through the link at the end of this article.
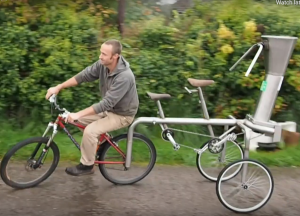
Test-drive with the approval of the fantails!
THE BACKSTORY
The electronic fault that arose in our automatic washing machine rendered it useless – an extremely frustrating but frequent problem in today’s world. I knew that the machine was watertight and that there was no problem with the rest of its mechanics and hence I started to think about doing away entirely with the electric motor and all the fancy pumps and stuff and converting the machine to human power.
Pedal power was the ideal choice as the washing machine functioned by the drum rotating with the laundry, water and detergent within it and leg power was much greater than arm power – and could keep going longer. The rotary motion of a bicycle was perfectly suited to this requirement.
A WORD ABOUT TOOLS
All the work involved in this conversion can be achieved with hand tools but it might be a good idea to invest in at least one power tool just to save time and effort. I work on the premise that tools are a great investment and that if you are going to consider DIY then they are essential. Similarly Safety Equipment is also a necessity, in particular when handling heavy objects and using power tools. Buying these items has an initial outlay but if you buy wisely these will last you for years of projects, for example my current electric drill is well over ten years old.
Electric Drill – Two of my favourite makes are Makita and Black & Decker
Set of Bits for the Above
Wood Saw
Set of Spanners
Range of Screwdrivers
Pliers, Drift or Chain Splitting Tool
Hammer
Centre Punch
Tape Measure
Safety Gloves, Boots and Glasses
Metal File
Tri Square
Additional if Possible:
Jigsaw with blades for sheet metal
Wood Screws, Nuts, Bolts, Washers and Wood Glue
METHOD
The first step I made after I had moved the machine into an outbuilding was to investigate the layout of its moving parts. This I did by removing the rear panel where the motor, pulleys and flat drive belt could be clearly seen.
At the time of removing the rear panel I decided to also remove the massive ballast weights (see above) that were bolted to the machine; these are fitted to help absorb vibrations caused by off-centre loads in the machine especially during the spin-drying cycles. I also lifted off the top of the machine so that I could take out any other superfluous items.
I decided to keep everything as simple as possible choosing to weld a small gear from the rear hub of a bicycle to the end of the electric motor shaft, a chain would then connect this gear to that of the pedal crank of the bicycle and the original pulley/flat belt transmission would remain.
I wanted the two machines to be on a common base and this I chose to be a wooden pallet (of course) this was a non-standard sized one of 140cm x 80cm (55” x 31½”). I could fit the two machines on this pallet because I’d decided that the chain from the pedal crank would go forward to a gear on the electric motor shaft, the limiting factor became that of the proximity of the pedals to the side of the washing machine. I established that I required a clearance of 75mm (3”) between the pedal at its closest approach. to the machine to allow me an unobstructed pedal action.
Now I had obtained the layout and positions of the two machines with respect to each other, I had to decide a means of supporting the wheel-less bicycle. As luck would have it, one of the shops that furnish me with wooden pallets had just thrown out a steel framed, wheeled dolly used to transport a ride-on lawnmower crate. This I cut up in the workshop to furnish me with the necessary steel angle for the support frames and four castors which I subsequently used in the fabrication of my cross-cut saw table. (link at end of post)
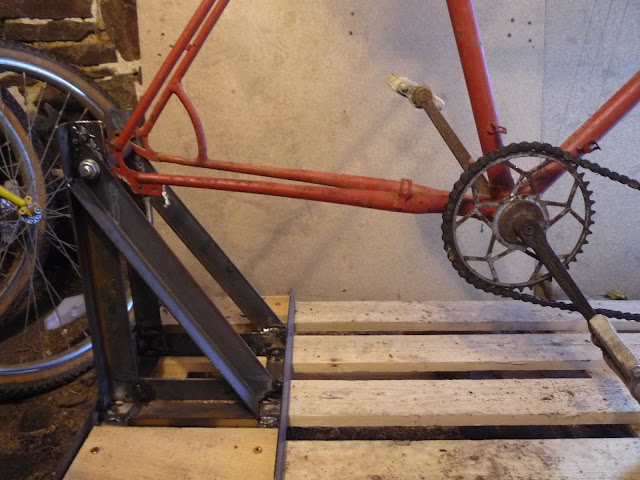
I welded two cradles from the steel angle to support the bicycle at the front and rear dropouts (the points where the wheels fit). The rear cradle was a right-angled triangular frame and the front cradle comprised two vertical tubes welded to a base frame both had a 10mm threaded bar welded at the cradle top to fit into the dropout. The cradles were screwed in place to the pallet, the critical positions for these cradles were at the proper distance between the front and rear dropouts and at the correct lateral position for the bicycle’s pedal crank to align with the gear on the motor shaft.
When the bicycle had been lowered onto the threaded bar ‘axles’, it was secured to the cradles using 10mm nuts, I found it necessary to put a spacer tube between the rear dropouts to give the nuts something to tighten up to, otherwise the process of tightening would squeeze the frame/fork tubes out of shape instead of clamping them.
The drive chain could then be attached.
I had already noted that the force from the drive chain was twisting the drum on its support springs so, to avoid the problem of the chain coming off, I forced two wooden wedges between opposite sides of the drum and the outer walls of the machine.
After a quick pedal to see if it worked I prepared for the first wash.
THE WASH CYCLE (PUN INTENDED)
It was only when I started to put the water into the machine for the first wash that I realised the need for a modification, that being the fact that pouring in water into the machine via the drawer destined for the powder was too slow – if I went too quickly the water just overflowed out of it. As the top of the machine was no longer in place, I sawed the top off the drawer compartment permitting a larger opening for the water.
I was surprised at how easy it was to pedal the full machine. In fact it was too easy due to the speed reduction of the belt drive between the motor shaft and the pulley on the drum. The reduction meant that: at normal pedaling speeds the drum was moving very slowly and I found it very hard to pedal when there was little to no resistance. Nevertheless, the initial laundry results were good and so the logical step was to alter the gearing to a more practicable level.
EMPTYING THE MACHINE
Normally, an electric pump empties the water from the machine and discharges it via a flexible hose down the drain. Washing machine pumps are of the centrifugal type, a vaned rotating impeller pushes the water up the pipe. If one lowers the pipe to below that of the water in the drum then the water will flow out, simply by the effect of gravity. I, therefore, used this simple technique, the additional height due to the machine being sited on the pallet made it easier for it to be completely emptied. I used the waste water on the flower borders in front of the house so I collected the water in watering cans and buckets.
There you have it, Mark One of our pedal-powered washing machine. We continued using this format for two washes each until we got a good feel of what I needed to change. In Part Two I will look at the add-on modifications for this basic machine, which both made it easier to pedal and gave us something of a ‘spin-cycle’.
In the meantime though and if you’d like to, sit back and watch our film.
If you read this article and found it interesting then share it with your friends on social media or suchlike. Please also feel free to ask questions and or make comments and if you found this helpful and would like to support this site you can always
You can also find all my films Youtube and also now on Odysee
Until next time and from a sunny day in Normandie,
Cheers, Andy
© Andy Colley 2015

