Materials list, including sourcing and cutting coppiced poles, fitting plastic end connectors, assembling, erecting and covering dome.
Materials & tools
- Coppiced rods: 35 Long and 30 Short
- Approx. 12m Medium Density Polyethylene (MDPE) pipe of correct size(s)
- Measuring tape
- Billhook
- Bow saw
- Pruning saw
- Sharp whittling knife
- Large hacksaw
- Two bricks
- Thin nosed pliers or tongs to hold plastic ends in oil
- Fire making materials; newspaper, cardboard, kindling, small logs, lighter
- Fire safety stuff: Bucket of sand, thick smothering cloth or rug, thick gloves, fire extinguisher.
- Old rag for cleaning oily plastic ends
- Small saucepan for oil that will be unsuitable for food use once used
- Larger saucepan with lid for water
- One litre of cheap vegetable oil
- Hammer
- Small nails/pins
- 26 x 80-100mm M6 roofing bolts and nuts
- Drill plus bits (7 or 8mm)
- Paint and brush
Outline of this particular design
The structure in this method is made from coppiced poles from ash, hazel or willow joined together by using 20-32mm water pipe and bolts.
Other materials can be substituted for the poles and other methods are used for joining poles together. One other common method is using 130mm (5”) diameter alcathene gas pipe and split pins but this is more expensive in materials.
Finding & cutting raw coppice material
You will need 35 “Long” and 30 “Short” poles for any size dome. The length of the poles will determine the eventual diameter of the structure. For a 4.25m / 14 ft diameter dome the length of the long poles will be 125cms (just over 4ft). The short poles are 10.4% shorter than the long poles. In this case for a 4.25m / 14 ft diameter dome the short poles are:
125 – (125 x 10.4) = 112cms
100
For a 3.6m / 12ft dome diameter the long poles are 113cms and the short poles are 101cms. You can scale your long (and short) poles up or down in size depending on whether you want a bigger or smaller structure.
The poles can be made from sawn timber or metal but coppiced poles are cheap, natural and easily available. They can in theory be cut from any tree species that can cope with coppicing. Coppicing is the rotational cutting of broadleaf trees in the dormant season i.e. winter when the sap is not rising. This produces multiple stems that can be harvested at different age ranges and stem thickness dependent on the intended use. If the coppicing is carried out in winter, the cut poles will retain their strength and the remaining stem will be able to grow again into new stems. Coppicing benefits the environment by prolonging tree life, regenerating old growth and carried out rotationally in parts of woodlands, it enhances the wildlife potential of the whole woodland. Different age structures of trees in a wood increase the overall biodiversity e.g. some flowers and plants only survive in the forest glades created when trees are coppiced.
For your dome willow, hazel, sweet chestnut and ash are good tree species to coppice. The choice will depend on the size of the Dome being built (e.g. willow for lightweight models) or availability of wood (e.g. sweet chestnut coppice not being available in most of the country apart from the South of England). Sawn timber can be planed and coppice poles can be stripped of bark and both treated with linseed oil for endurance. Alternatively coppice poles can be left with the bark for the “rustic” look. Ash and hazel are common and useful species in North Wales. Some tree species don’t coppice so well, e.g. beech.
Coppicing is done by cutting the stem of the tree about 10cms / 4” above the ground at an angle so that the remaining stump sheds rainwater and does not rot. This can be done with a billhook, bow saw or pruning saw. The billhook will leave a messy stump that is more susceptible to disease and the bow saw can be awkward to use in tight spaces although it is easier to use if the diameter of the tree is large and easy to reach. A good quality pruning saw costing approx. £15 is easy to use and carry, can get into very tight spaces in abandoned coppice or hedgerows and can easily cope with diameters up to 5cms / 2”. The diameter of your poles needs to be between 15 and 35mm depending on the use of the model: making a compromise between weight and strength. You can trim any side branches and excessive length off in the “field” and leave it for the wildlife.
The type of coppice we are talking about in terms of tree species, pole lengths and diameters are easily available. Try asking nature conservation bodies such as the Countryside Council, local Wildlife Trust or Woodland Trust. They often have woodland nature reserves where coppicing is a requirement of their management plan. You could also ask sympathetic private landowners / farmers. If you have no success with any of these options then you can consider “guerrilla harvesting”. Since the wood we are talking about is considered as nothing but “waste” in our society, carrying your pruning saw when out for a walk around country lanes you are always ready to harvest a pole or two here and there. Think about how much benefit you are doing to the environment!
Preparing poles: cutting to length and whittling ends
You will need poles fairly straight or at least with both ends being in a straight line if an imaginary line was drawn from end to end. Cut to the lengths you want (see above).
Then whittle the bark and wood off 4cms from each end. Each end should be tested with the desired water pipe diameter to see if it fits. Stop whittling at the point when the pipe feels as though it will just fit very tightly. You are ready to make and fit the plastic ends now.
Making the plastic end connectors
MDPE water pipe – the pipe used to carry mains supply and potable (drinkable) water, is used to make the connectors in this design. Outside diameter measurements for this pipe are available in 20, 25, 32, 50 and 63mm. As a guideline: for a 14ft diameter dome using poles about 1 inch diameter you will need mostly 25mm but for a more lightweight transportable structure 20mm will be used for lighter thinner pole ends and for a thicker pole, stronger structure 32mm diameter pipe might be used as well as 25mm. You are unlikely to ever need 50 or 63mm except for larger stronger structures. Bear in mind that the cost of the pipe per metre increases significantly with its diameter! (50mm pipe is approx. 5 times the cost of 20mm pipe per metre!) There are two sorts of pipe available, in black or blue.
Blue is most commonly available and is generally used for below ground use so its blue colour is easily identified when digging. Black is for above ground use and so is less intrusive to the eye. It is also UV light stabilised to degrade less quickly than the blue pipe. However blue pipe can be used successfully for many years above ground without degrading so don’t be put off if the colour appeals to you! Also you might find that black is only available on order for a minimum 25m roll when you only need half that.
Making the Ends: Cut the pipe into 8cms (approx 3”) lengths with a hacksaw (longer if using 32mm or larger diameter). You will need 130 of them but maybe making a few spare extra ones will be useful as well. You need to squash one half of this 8cms pipe flat. Once drilled with a hole this will connect to other rod connectors with a bolt. The pipe-squashing layout consists of a pan with 4cms depth of vegetable oil heated over a small gas burner or a small open fire with a trivet or grid. Oil is used instead of water since oil has a higher boiling point and therefore will melt the plastic whereas water will just soften it. When the oil is hot it will start to smoke so this is best done outside! The heat should be maintained relatively evenly for the duration of the entire operation. The temperature should not be too cool that you have difficulty squashing your ends and not overly hot that the oil may spontaneously burst into flame. Have your fire safety gear to hand just in case – don your gloves, cover the pan with a thick cloth and remove the pan instantly from the heat source and allow to cool before removing the cloth. The cloth cuts out the oxygen needed for the oil to burn. Removing it too soon will mean the pan may still go up in flames again.

PLEASE NOTE: DO NOT PUT AN OIL FIRE OUT WITH WATER – THIS WILL MAKE THINGS WORSE
Once your oil is at the right temperature, stand one of the 8cms pipes pieces upright in the pan (for approx. 10-15 seconds if the oil temperature is right and quite hot). Watch the pipe and remove it once you see that it begins to sink or lean or you can feel it sticking to the base of the pan. Lay it quickly on a smooth hard surface like a brick and squash the one half of the pipe with the other brick holding it down firmly for approx. 10 seconds. Remove the top brick, clean the oil off a bit with a rag and allow the connector to cool.
|
|

Once cool you can drill a hole through the squashed spade end of the pipe. Tip – use a drill size just larger than the diameter of the bolts you are using – it will make erecting and dismantling your dome much easier (e.g. if you are using M6 bolts (6mm diameter thread) then use a 7 or 8mm diameter drill bit).
You should now have something like this:
|
|

Fitting plastic ends to poles
You will need a pan of simmering water in which you can fit the open plastic ends. After a minute or so this will soften the plastic enough to make it more flexible and it will stretch slightly. You can push it forcefully on to the pole end while hot and when it cools and shrinks slightly it will form a tight fit. For extra security, tap in a small nail or two through the pipe and into the wood to prevent it falling off.
When it comes to erecting the dome one useful tip is to mark all long poles in a certain colour and short poles in another to identify them easily. You could paint a small strip 5cms /2” long at one end of each long pole in white, for example. Longs and Shorts made using blue and black MDPE pipe ends could also quickly identify them.
Erecting your dome
Lay your poles flat out on the ground as illustrated below (L=long pole; S= short pole!)
You could lay all the long poles out first in their 6 pentagons (the five sided dark lined objects in the diagram below!). Then fill in each pentagon with their 5 short “pole-spokes”. You are left with five long poles over, which connect the 5 outer pentagons at the base of the erected dome.
|
|

Start bolting the rods together beginning right in the middle with five short poles (marked 1 in the diagram) and working your way out. You can connect the six rods (4 long and 2 short) together (marked 2 in the diagram) and continue round in a circle fixing all five points of the central pentagon 1.
Moving outwards again to point 3 in the diagram fix together the 4 long and 2 short poles, working your way around the dome in a circle again. You can then connect the five short poles or “spokes” of each outer pentagon (marked 4 in the diagram). Lastly, fit the outer connectors (marked 5 in the diagram), this will be 3 longs and 1 short pole together (10 times). Fit the nuts on the bolts very loosely to begin with because as the dome goes up it needs to be flexible in its movement. If you tighten the nuts as you put it up then they may be very difficult to undo when you want to take it down! Even when you have completed the last pole, the nuts only need to be very loosely hand tightened.
It is a very exciting and satisfying experience when the structure starts to take form and is finally up! Do not be put off by the initial working out of the domes erection and it being seemingly complicated. It is soon easily picked up and one person alone can erect it in about 20 minutes when competent.
Doorways can be made anywhere in the dome structure and enlarged by taking out a single pole for easier access. Larger areas can be removed temporarily for larger access for displays etc.
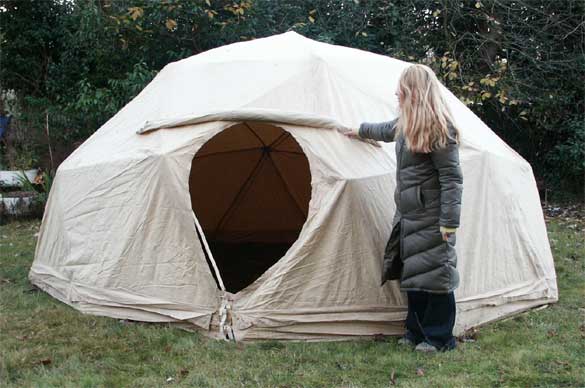
Covering the dome
Geodesic dome covers are usually made from cotton canvas offering a flame retardant, waterproof and tough covering. New canvas can be bought “of the roll” and made up yourself by sewing the strips together or made up for you by professional cover makers. This is an expensive option (approx. £3.50-£5.00 per square metre off the roll to make your self and £700+ made up for a 4.25m / 14ft diameter dome) although the canvas will last a lifetime. Second hand canvas is a much cheaper alternative but usually involves some ingenuity in adapting its shape to your own requirements. Second hand canvas sheets can be brought from £20 – £150 dependant on size and quality. Try ex-army stores and marquee hire firms in your yellow pages/internet. Be careful about the quality – really old canvas may not be waterproof. Reproofing can be done with a liquid solution painted on to the canvas or the canvas bathed in the solution – if the canvas is still in reasonable condition to warrant this.
Other material coverings have been used such as glass, Perspex, metal or wooden sheets. Polythene sheets are much cheaper than canvas but don’t “breathe” so are prone to condensation.
Felting is also another possibility. This is a fabric made from the wool of various animals. The fabric is formed by pressing and matting the wool, using heat, moisture and friction. This causes the wool fibres to interlock without spinning, weaving or knitting. It is traditionally used to cover dwellings such as Yurts of central Asian nomads who live in relatively mountainous lands with harsh climatic conditions e.g. Afghanistan, Mongolia. There the dwellings and felt show their strength and endurance in cold windswept conditions. Evidence suggests that the Yurt and feltmaking has been in existence for at least 2,500 years.
Talk to our partner David at World Tents about canvases.
Second-hand canvas sources:
Sheets can be brought from £20 – £150 dependent on size and quality. Try ex-army stores (dark green canvas) and marquee hire firms (white and light green canvas).
Sourcing of other materials
MDPE pipe is available from any plumber’s merchants and some builder’s merchants.
Roofing bolts, nails/pins also from most builders merchants or good hardware stores
Most other tools are available from a good local tool shop.
LBS Horticulture, Standroyd Mill, Cottontree, Colne, Lancashire, BB8 7BW (mail order). Tel. 0870 7273615; e-mail [email protected] sells MDPE pipe, polypropylene rope (for tying canvas) and pruning saws.
Screwfix Direct, Houndstone Business park, Yeovil, BA22 8BF (mail order). Tel. 0500 414141; www.screwfix.com sell roofing bolts, nails, pins, polypropylene rope and various tools.