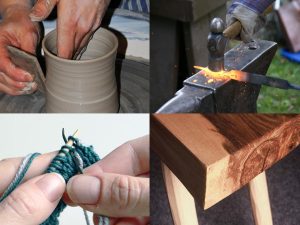
We recently interviewed potter Tom Humphries, and he gave advice about making a living from making pottery. Here he gives advice for beginners about firing pottery in a small gas kiln.
Getting a Gas Kiln
I’m going to assume you are reading this because you either just bought a gas kiln or are interested in getting one. I’d thought about firing with gas long before I made my kiln. It just seemed very scary to actually start messing with big gas bottles and lots of flames.
When we moved house I had the decision made for me. The cost of putting a new electric line to where I wanted my old kiln was massive, and it was on its last legs. So I took the plunge and decided to convert my old electric kiln to gas. The Ceramics Arts Daily forum has a few other good threads about doing kiln conversions, and you can find other info by Googling. I wont go into details here as it’s mostly covered in the thread.
I’m not suggesting converting an electric kiln to gas is the best solution. In fact there are many problems doing it this way, especially with very small kilns like mine – I’ll cover those later. If you have the funds for a proper gas kiln, or can find one second hand they will probably be your best option. Converting an old electric kiln is primarily to save money, old electric kiln that are no longer functioning can be bought cheaply and modified with a burner kit and chimney materials.
I’m actually out growing my kiln a bit, and the lid is pretty close to failing I think. I’m hoping to build a new larger kiln from scratch next time. I will re-use the gas burner I have and buy a load of high temperature firebricks. A kiln build like that requires a large amount of research and planning. I’ve found a lot of help on forums again for this, and also The Kiln Book by Olsen.
Getting gas bottles for kiln firings
Before I started using my kiln the only exposure I had to the process was through youTube videos. I saw Simon Leach and Steve Booton firing with huge gas bottles. The only gas bottles I had ever seen were the little ones they sell at garages for running your BBQ from.
Using my nibble fingers I tapped away at my computer to discover more.
Most small gas kilns use propane bottles as their fuel. The bottles come in variety of sizes from 3.9kg up to 47kg. These weights refer to the amount of gas in the bottles, the 47kg ones actually weigh 95kg when full! The really big gas kilns are often plumbed into natural gas pipes – the same type used for gas cookers.
It turns out the major suppliers of propane gas in my area of the UK are Calor and Flogas. They list retailers on their websites and I found a Calor place actually in my village. The way these places work is you pay a deposit for the bottle the first time you get one. You also pay for the gas, and pay for gas each time you refill. The deposit cost with the Calor place I used was nearly as much as the refill.
I started off with just one 19 kg bottle of propane. After about 4 firings the bottle ran out and I had to rush to the shop for a refill before continuing my firing. They don’t actually refill the bottles there – they just give you a new bottle.
After a couple of times doing this I decided to get a second bottle. It was much less stressful to just switch them over when one ran out. I could fire the kiln in the evenings when the shop was shut and get a refill the next day.
I’ve recently switched to buying the 47kg bottles from Flogas as it works out a lot cheaper. The deposit is very small and the gas is nearly half as expensive, although I do have to travel further to get it. Some companies deliver bottles which could be a good help, the large bottles are quite hard to move around even with my big muscles 🙂
What type of thermocouples do you need for gas kilns?

To answer the original question about types of thermocouples…
The question is not really specific to gas kilns, the same types could just as happily be used for electric kilns.
When I used to fire my kiln electrically I didn’t use a thermocouple, I just relied on cones to see the top temperature. As gas firing requires you to alter the atmosphere of the kiln at various temperatures, it’s really useful to be able to see what the temperature is at all times.
What is a thermocouple?
Thermocouples are constructed from a couple of metal wires covered in a ceramic stick. As the temperature in the kiln increases, the voltage at the terminals of the metal wires changes. This voltage is converted usually by a digital pyrometer into a temperature readout.
The different type of thermocouple refer to the material used to construct the wires. Most common type in ceramics are type K (chromel-alumel) , type N (Nicrosil-Nisil) and type R and type S which are both Platinum/Rhodium composition.
What type of thermocouple should you buy?
I should say that I’m from Yorkshire and I’m quite careful with money, I shop at Aldi and did my own house extension.
If you go shopping for thermocouples at a potters supplier they can cost around £100 each. Pyrometers from these suppliers are also around that price.
I decided to buy a cheap thermocouple and pyrometer set from eBay. I’ve now realised you can buy the parts separately so save more money. Search eBay or Amazon for “tm6801 pyrometer” and “type k thermocouple kiln” and you should find them.
These units are made in China and are incredibly cheap. You get what you pay for and these certainly don’t look as nice as the more expensive options. Most noticeable on the thermocouples is that the ceramic sheath on the cheap ones are just a series of rings with air gaps around them. On the expensive ones it is one solid ceramic tube. I imagine this extends the life of the thermocouple through reduced corrosion of the wires.
So far my cheap set is still working after around twenty cone 8 firings. After my last firing I noticed the thermocouple is a bit bent, possibly because I had it right above a shelf during firing. Previously it has always been a few inches away from a shelf. It’s a good idea to keep the thermocouple away from shelves as the shelves get really hot and can skew the readings of the overall kiln temperature.
I have just ordered a replacement thermocouple from eBay for £8 in case my bent one doesn’t work next firing.
Perhaps if I had bought an expensive set from a pottery supplier they might have been more robust. I have no way of knowing, but could replace these cheap ones ten times over and still be spending less.
There may be certain firing cycles or glazes that require very accurate temperature readings. In this case the expensive option may be more accurate but I have no evidence of this.
Should you use pyrometers instead of orton cones?
Pyrometers are a useful tool for measuring temperature. To really be sure about how well pottery and glaze is melted we need to measure heatwork – the combined effect of heat and time. A kiln can hit ‘final temperature’ in 3 hours or 13 hours with very different results. For this reason orton cones are an essential part of the firing process even when using thermocouples and pyrometers.
Firing cycles and when to reduce with small gas kilns
The way in which a kiln is fired can have dramatic effects on pottery. Many glazes and clays will look very different depending on how quickly they are fired, and how much oxygen is present.
It’s worth remembering that just because the fuel is gas, it doesn’t mean the kiln needs to be fired in reduction. I prefer the look of most of my glazes fired in a very slightly reduced atmosphere.
Here are my very general firing cycles, they may vary depending on how many and what type of pots I’m firing.
Bisque firing cycle
My gas burner is fairly oversized for my kiln which has given me some troubles in the early stages of bisque firing. Basically it’s hard to keep the temperature low enough to stop pots or cone packs exploding.
The most trouble I’ve had has been with dinner plates. I once bisque fired a load of eight plates and every one was cracked when I opened the kiln. My small kiln doesn’t have a bagwall to shield the pots from the flame. This means the hot part of the plate gets a lot hotter than the cool side away from the flame. Big temperature differences result in cracks.
Since then I have been able to fire plates successfully, but great patience is needed.
- Make sure all ware is thoroughly dry before loading kiln
- Prop lid by about three inches which a spare brick
- Start flame as low as possible with it blowing out. I need to put the burner right up against the kiln wall at the start to avoid the wind blowing the flame out.
- Keep kiln at around 80 C until all moisture has been evaporated. This can be checked by holding a mirror above the chimney – it will steam up if there’s moisture still. (this couple take 1 – 3 hours depending on load)
- Close lid and keep flame the same low for around 1 hour.
- Slowly increase the gas to keep the kiln climbing at around 150 C per hour
- At 800 C slow the climb to help burn off any impurities in the clay
- After an hour or so increase gas to climb a little faster until the cone drops. I bisque to ^06.
Reduction glaze firing cycle
- Start with very low gas flame for about 30 mins, with all the peepholes open. I’ve had cone packs explode before so like to make sure that won’t happen – it’s really annoying having to stop firing and unload the kiln to clear up bits of cone pack.
- Start climbing around 150 C per hour, this requires checking the kiln every hour or so and adjusting gas to maintain the climb. At 500C I close the peep holes.
- At 1060C I close the chimney to just about 1 inch open. The gas may need to be adjusted – the aim being a flame from both peepholes, and maintaining the temperature. I hold the kiln in reduction for around 45 mins.
- After reduction I open the chimney fully open and continue climbing at around 150C per hour.
- I check the kiln at least every 30 mins at this point. Once I can see one of the cones starting to bend I will check it every 10 minutes.
- Once top and bottom cones are sufficiently melted I turn off gas and put a brick over the chimney to slow the cooling.
Firing a gas converted gas kiln video
This video was the very first firing in my converted electric to gas kiln. I’ve learnt a lot since then, and also built a roof so don’t need the umbrella any more!
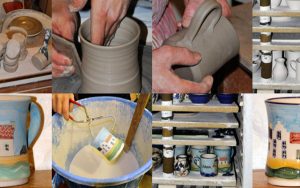
Kiln build progress photos


Go and fire something!
Hopefully this article has explained gas firing a little better, and made the process less intimidating. If you have any follow up questions please leave them below and I will try and fill the gaps with a future update.
1 Comment
Interesting, whilst I have little intention to indulge in pottery (at the moment which at my age means probably never) I did notice the mention of a couple of gas suppliers. One of these being Calor Gas, possibly in it’s day the largest supplier of bottled gas in the country (England – I have no knowledge of the other three but they are probably much the same). For many years Calor not only supplied bottled gas to the publuc but delivered as well. Over the last couple of years it seems they have changed this (something to do with insurance I believe – maybe not)Now, if you want Calor Gas you have to get it from a seperate retailer – most of who do not deliver. This can and does cause a problem for the non drivers in society, you would be amazed at the number of non drivers there are around the place! Whilst I only use small (not that small) gas bottle to heat my ‘home’ so a good friend or relative is needed to obtain the stuff. Good luck to anybody on the hunt for the stuff!