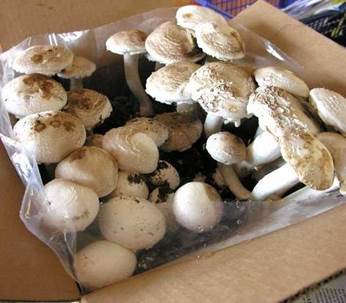
How to grow button mushrooms


Agaricus is unlike other mushroom spawn in that it is a secondary decomposer; this means that it needs to work with bacteria which carry out the primary decomposition of cellulose material into a form accessible by Agaricus. The mushroom growing substrate referred to as ‘compost’ is quite different from garden compost or soil. If the substrate is fully decomposed then the mushrooms are unable to grow. It is therefore necessary to produce the compost in exactly the right stage of decomposition (partially broken down). Failure to grow Agaricus is almost certainly due to failure to provide the right compost.
Stages of growing button mushrooms:
- Preparation of the compost (this can take 3 weeks or more)
- Pasteurisation of the compost
- Spawning the compost
- Spawn run (mycelium grows through the compost)
- Fruiting (up to 6 flushes are possible)
The best substrate is horse manure mixed with straw. The ideal compost is bedding cleared out of horse stables, which has been left to rot for around 3 weeks. If you can get this type of compost, simply move on to the pasteurisation step. Check that there is no smell of ammonia – if there is, leave a little longer. Turning the compost every few days is ideal, allowing more oxygen to enter and the substrate to break down better. If you are using plain horse manure without any bedding, you should add some straw to the material. A typical mix is 50% straw, 50% fresh horse manure and a small amount of gypsum (plaster).
Soak the straw thoroughly in water – ideally submerge it in a tank of water for 2-3 days. This will wet the straw well but also start a fermentation process which is very beneficial to the resultant mushroom compost. Prepare the compost in a sheltered area with a hard floor by spreading a layer of straw about 15cm high and about 1.5m x 1.5m in area. Then sprinkle a generous handful of gypsum over this and add a similar layer of manure. Repeat until you have created a mound approximately 1.5-2m high. This will consume around 2 bales of straw.
Cover the pile with polythene or tarpaulin to avoid drying out and leave for about 2 days. The pile should start to heat up – you will need to turn the compost to prevent it from becoming anaerobic. Loosen the compost up as it will begin to sink. Repeat again at 2-day intervals until the compost stops heating. The compost is ready to move into the mushroom beds at this stage. The heating should reach 70 degrees C, which will pasteurise the compost and prevent the growth of competitor microorganisms. Once cooled, the compost is ready for Agaricus spawn to be added.
If you wish to prepare small quantities of compost, it may not heat up readily and will require a longer time to decompose. In this case, the compost will not have heated sufficiently to pasteurise, so you will need to heat it yourself to achieve this. It also kills off insects which may be present in the compost (could prevent mushrooms from growing). If you have obtained rotted manure/bedding from horse stables and you are not sure whether it is pasteurised, you should play it safe by pasteurising your compost. The best way of doing this is by steam.
You could use an old pressure cooker – place some water in the bottom of the cooker and fill the inner trays with compost. Heat it until the water starts to boil. The steam will pasteurise the compost – ideally it should be heated for a half-hour or more. For larger quantities, a pasteurisation unit can easily be created out of an oil drum (205 litres) or vegetable oil drum (20 litres). In all cases, make sure that the compost isn’t burnt by touching hot walls of the container and that the water isn’t all boiled away.
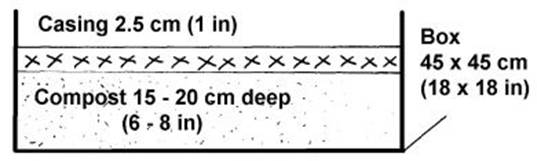
If the spawn is added to the compost when the temperature is above 30 degrees C, it will be killed, so make absolutely sure (leave overnight) that it is cooled to ambient temperature. The compost should be saturated with water but not enough that it drips out if a handful is picked up. If you squeeze the compost in your hand it should retain its shape and it should be possible to squeeze water out of the compost. Place the compost in a growing container; growing containers can be plastic biscuit tins, polystyrene packaging boxes, polythene bags, cardboard boxes, wooden boxes etc. The ideal size of the box (for convenient handling) should be 45 x45 cm and 25 cm deep. The box needs to be cleaned thoroughly with soap and water, and the soap thoroughly rinsed off before use.
Ideally the compost should be 15 to 20 cm deep, but leave enough space to add 25 mm of garden compost (the casing) at the top during the fruiting stage. Add the spawn to the compost (approximately 3% by dry weight); so 60g of button mushroom spawn will seed up to 4kg of compost. Ensure that the compost is all under 30 degrees C (failure to ensure the compost is adequately cooled is a common cause of poor/no results); mix the spawn thoroughly.
Next, you need to create a high CO2 environment for the mushrooms to grow. This is done by covering or enclosing the compost in polythene. This encourages the spawn to run through the compost. Place this somewhere dark (although this isn’t essential) and at warm room temperature (20 to 26 degrees C) but not above 30 degrees C. After a few days, you will see thread-like growths coming from the spawn, and after a few more days, the compost should look like it is covered in cobwebs or mouldy. This is the mushroom spawn growing. Depending on temperature, compost and general conditions, this will normally take 11 to 21 days. In poor conditions (if the mushrooms are left outdoors in cold weather), the spawn run may take several months. Often the mushrooms will surprise you many weeks or months later, when you thought things had gone wrong.
When the spawn run has completed (don’t rush this stage or you will get fewer mushrooms), you need to increase air circulation, which reduces the CO2 level and stimulates fruiting. Remove any bags/covers and spread 25 mm of garden compost. This is called ‘casing’ and for reasons not entirely understood, it stimulates Agaricus fruiting. The garden compost needs to be fresh from the bag, so that it is uncontaminated. The temperature should be dropped slightly (to 16-20 degrees C) and air circulation should be increased. Evaporation will increase, so use a plant sprayer to keep the surface of the casing damp (but not wet) by spraying twice a day.
After 7 to 10 days, you should see white dots appearing on the surface of the casing. These are ‘baby’ mushrooms (pins), some of which will develop into mushrooms. Try not to spray these pins directly, as direct contact with droplets of water can cause them to abort. It may help to loosely cover the growing container with some polythene to reduce evaporation, but it will be necessary to manually remove this twice a day to allow air exchange, otherwise build up of CO2 will prevent effective fruiting.
After the first flush, the compost will rest for 7 to 10 days and it should provide a second flush. You should get at least four flushes and sometimes up to six, but each flush will get successively weaker. When no more mushrooms will grow, you can use the spent compost as a valuable mulch/soil conditioner. Sometimes you will even get a few mushrooms growing after the spent compost is spread on the garden, particularly if the location is damp and organic-rich.
Thanks to Clifford Davy of Forest Foragers.


