How to grow shiitake mushrooms


Shiitake mushrooms require cellulose-rich material and will grow on a variety of woody substrates. My preference is for oak (or other hardwood) sawdust. In fact, Shiitake will grow on softwood sawdust (which is often far easier to obtain), but ideally requires some additional nutrients like bran and sugar. Shiitake will probably grow on a variety of other materials and experimentation will reveal those best suited. Two general methods work for growing Shiitake: one is using logs and the other is artificial sawdust ‘logs’ in bags.
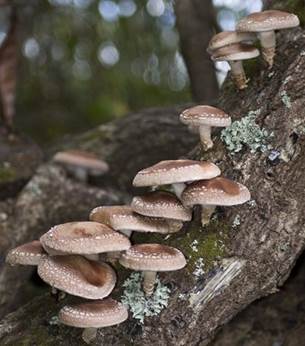
Shiitake Mushrooms
This process is slow; the yields of mushrooms are lower, but they taste better, less maintenance required, easy to do outdoors and without any specialist equipment. Shiitake naturally grows on hardwood logs. Logs of 10 to 20cm diameter are best as they are easiest to handle. The logs should be inoculated within 6 weeks of felling because it gives the Shiitake the greatest chance of colonisation, with least threat of competing microorganisms. Ideally, the log should be cut when the tree is dormant, although if trees have fallen over, it makes sense to inoculate regardless of time of year. Logs are often inoculated using Shiitake dowel but actually, grain spawn can be used just as well.
Clean the surface of the log with a wire brush but not hard enough to remove the bark. Drill holes of 10mm in diameter and about 50mm deep into the logs, at 15cm intervals, spaced evenly over the entire surface of the log. Fill each hole with a dowel or grain spawn, and seal the top with hot wax to prevent dirt, microbes etc. entering; the heat also sterilises the top layer of the dowel or grain spawn, thus killing any potential contaminants on the surface of the inoculant. It may be advantageous to partially bury the log in the ground (horizontally) – this helps to keep the log moist; locate the log in a cool shady area, away from direct sunshine.
The spawn run will take 5-12 months dependent on temperature. The log will tend to fruit twice a year – spring and autumn, although it is possible to force the mushroom into fruiting more often by soaking for 24-48 hours in cold water and then standing up in a shady area away from
winds (some people prefer to initiate the crop by spraying liberally with a hose). Lay the logs down to rest for 6-8 weeks after fruiting and then repeat the cold shock to initiate the next crop. Shiitake logs can fruit for several years before they become exhausted.
Inoculation in ‘artificial logs’ (sawdust blocks)
This is my preferred option – it is relatively easy and much quicker than using natural logs (3 months to fruiting). The yield is much higher but the taste is less ‘earthy’ and some consider the taste inferior to natural log-grown Shiitake. With regards to substrate, I have used sawdust on its own successfully but the yields are likely to be a lot lower than if nutrients are added. A typical recipe might be: 95% hardwood sawdust, 3% rice bran, 1% wheat bran and 1% chalk or 75% hardwood sawdust, 24% straw and 1% chalk.
Due to its slower growth, Shiitake substrate is best sterilised rather than pasteurised, although not so easy to do at home. However, I have been perfectly successful using a pasteurised substrate. Ideally, the substrate should be heated to 120 degrees C for a couple of hours under pressure to sterilise. A pressure cooker can be used to easily achieve this. I use an additional vessel (a perforated biscuit tin) in the upper region of the pressure cooker to increase capacity. The sawdust must be cooled to below 30 degrees C, otherwise there is the danger of killing the spawn before it’s even started growing – leaving the sawdust to cool overnight without opening the pressure cooker is a good option.
Once cooled, the spawn should be thoroughly mixed into the sawdust. The better mixed at this stage, the faster the spawn will colonise the substrate. I have seen good colonisation within 14 days where the substrate has been prepared in this manner. I usually mix the substrate and spawn by hand, but it does require clean conditions and there’s always a risk of contamination. Firstly, I spray the work surface with antibacterial spray and wipe down. I do the same to a metal tray which will be used for mixing.
Immediately before handling the substrate or spawn, I wash my hands thoroughly and after drying, use an alcohol-foam to sterilise the surface of my hands. I then ensure that the tray is completely dry and spread the semi-sterilised sawdust onto it. The spawn is added and it is thoroughly mixed. Any clumps of spawn are broken into their component parts. The more inoculation points the better – it’s the number of particles rather than the total mass which will ensure a fast colonisation. Once mixed thoroughly, it should be loaded into a clean (preferably sterile) plastic bag. The bag can be loosely tied or you can use a collar ring and some cotton wool to provide gas exchange.
Growing Shiitake on sawdust consists of 5 stages of growth:
- Spawn run and coat formation
- Coat hardening (browning)
- Shocking
- Fruiting
- Recovery
The spawn run can take 1-3 months depending on the type of substrate, temperature, humidity and way it has been prepared. The spawn run should be allowed to take place in a warm environment (room temperature). It may be necessary to add clean water from time to time to keep the substrate moist (but not too wet). As the spawn run nears completion, a white coat will begin to form on the outside of the substrate mass. This coat will help to prevent infection – this will begin 2-4 weeks after inoculation. The surface will eventually begin to develop bumps. These bumps may go on to turn into primordia (which then turns into mushrooms), but many will abort. Once bumps start to form, increase the aeration (by slitting the bag and/or increasing ventilation) which will allow some red/brown colouration to form on the surface.
When approximately one-third of the substrate has turned brown (coat hardening), remove the plastic bag altogether. Maintain humidity etc. as for the previous stage, spraying as necessary to compensate for the additional aeration. The purpose of this stage is to increase oxygen levels at the surface to ripen it. Shiitake can be shocked by a variety of methods. Physical shock is one trigger – another is immersion in a cold bath for 48 hours. At the same time, there should be some daylight present. When the mushrooms fruit (duration of 7-14 days), cut it close to the surface. Do not tear out of the block or damage leading to infection can occur.
Once the block has fruited, move to the recovery stage. Lower the humidity (70%) and increase the temperature (20 to 30 degrees C) during the recovery stage to allow the blocks to heal (duration of 7-21 days). At the end of this stage, proceed to the shocking stage which re-initiates fruiting, but also (importantly) replenishes the water stored in the block, which will be necessary for the production of new mushrooms. Blocks will fruit approximately 6 times – towards the end, mushrooms will be smaller and will produce lower yields.
Thanks to Clifford Davy of Forest Foragers.


