Earthen floors - introduction
Lowimpact.org is now archived. Topics are now curated by specialists on Growing the Commons. Here’s Earthen floors on GtC.
“Heaven is under our feet as well as over our heads.” ― Henry David Thoreau, Walden
Contents
What are earthen floors?
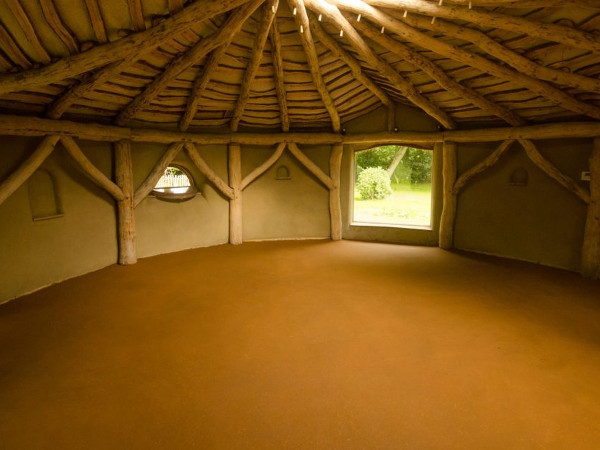
[Main image: 50m² Earth floor in a roundhouse yoga studio. Pic: Earth Floors UK.]
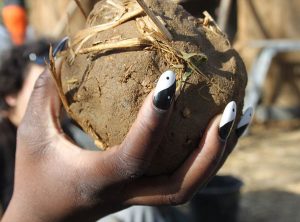
An earthen floor (or adobe floor in the US) is a floor made of earth that has been compressed, polished and oiled. It relies on the sticky binding properties of clay – that most versatile of building materials. Clay expands when wet, creating sticky platelet particles, like little suction cups. When coarse sand is added, compressive strength is increased and shrinkage reduced as the clay dries. Fibre is added to increase tensile strength and knit everything together, like reinforcing steel bars in concrete. The finish mix is essentially the same as adobe or cob, and the installation is similar to a concrete slab, only without the environmental impacts or cold nature of cement.

Throughout history, most homes have had earthen floors – usually just rammed earth, often with a layer of straw for warmth, and that could collect dirt and be swept out and replaced. Mint was sometimes strewn on the floor too, and treading on it helped spread a minty smell around the room.
A typical modern earthen floor involves a build-up of layers, each with a purpose. Each layer is described below, including the function it serves and (in some cases) alternatives you can experiment with. The example here demonstrates a floor installed “on grade”, similar to a concrete slab. This is a basic method that performs well and is forgiving to install. You can also install the adobe on a framed floor, but be sure to stiffen the joist framing to minimize flex, otherwise your floor will crack over time.

What are the benefits of earthen floors?
- They have a warm, natural feel, but are also cool in summer.
- Earth is a natural, biodegradable, non-toxic material, with no energy required for processing.
- The earth can be sourced on-site, reducing transport distances and therefore fuel.
- The (main) material is free.
- Lower embodied energy than any other flooring, and hugely less than concrete slab.
- They invite creativity – objects or other natural materials such as stones can be embedded in the floor.
- Thermal mass can reduce heating bills.
Step-by-step guide to the installation of a sealed earthen floor in Oregon.
What can I do?
First, read more. Our advisor Sigi Koko recommends Earthen Floors by Sukita Reay Crimmel.
Below, Sigi describes one method of installing an earthen floor – but there are many more. Read a bit around the subject to gain an understanding of the function that each layer serves. You can adjust and experiment while being sure to do the most important thing – keep moisture out of the floor.
So, starting from the bottom up…
1. Substrate
The floor has to rest on solid ground (or a stiff framed floor with little flex). If you have movement below, the floor will crack. So you want strong, compacted earth to build on, free of topsoil or organic matter, since it will continue to decompose and shrink in volume over time, leaving you with voids below your floor. Dig down until the soil feels solid and compact. You can even go over the ground with a hand tamper to ensure compaction.

2. Capillary break
Install several inches of gravel to provide a capillary break that prevents any water that may be in the ground from rising up into the floor. 10-15cm of pea gravel or angular 2cm stone.
3. Vapour barrier
Lay a vapour barrier that covers the entire floor area. This provides your final moisture control for the earth, blocking any air-borne vapour (from evaporated ground moisture). 6mm polyethylene sheeting works – exactly what’s used to prepare a concrete slab. The plastic is obviously not natural, but it’s excellent insurance.

4. Insulation
This is the layer that is most often left out, but it can dictate energy performance and comfort. If you live in a hot climate, skip the insulation, because a cool floor is beneficial. But if you heat your building, you want to keep the heat inside. If you don’t have insulation below your floor, then you are, in effect, heating the endless thermal mass of the ground below. I use R-10 insulation for a typical floor and bump up to R-15 if the floor will have radiant heating in it. You want that heat to follow the path of least resistance into your space, not down into the ground. And you need that insulation to be non-biodegradable, otherwise it will compost under your floor and disappear over time, leaving you with a cracked & heaving floor. This is one place where I’ll use rigid foam, since the reduction in energy over time quickly offsets the impact of the foam manufacture. For a natural alternative, you can use a rigid insulating mineral, such as pumice or perlite.

5. Base layer
Two layers mean that I can pour the thick base layer before the exterior walls are completely closed in. That extra air-flow speeds up drying time. I use the same proportions I would for cob, which is generally 15-25% total clay plus 75-85% sharp sand – but I add lots more water. With cob, a wet mix means you can’t build higher until the material dries. But with a floor, you want to be able to pour it, like a really thick liquid (about the consistency of chocolate pudding.) Sifting clay from on-site through a 1cm screen is fine. To this mix, add lots of long fibre (straw, or whatever is abundant in your region). This knits the floor together and helps prevent cracking.
More details on installing the base layer.
Underfloor heating pipework can be laid in the base layer.
Explanations of different kinds of plastering trowel.
6. Leveling layer
There are a few approaches you can take for this layer. I float this layer smoooooth and then polish it as it hardens. Some people float this layer reasonably smoothly, and then apply a super-thin layer for the desired texture. By polishing this layer as your finish floor, you avoid the extra step of additional layers. The benefit of applying a thin final layer is that it’s easier to control the texture of a thin coat than a thicker poured floor. You decide which is less stressful to you. Either way, the goal of this layer is to end up with a floor that is level (and if it’s your finish, then level & smooth). In the first layer, small imperfections are not a concern, but this layer is what you will see for years to come. This second layer uses the same mixture as the base layer, with two modifications:
- if using clay soil from the site, I sift it a bit finer – 5mm screening
- any straw in this layer should be chopped to 2cm or shorter
This is because smaller particles allow you to float the floor to a finer finish. I don’t always use straw in this layer of the floor, since it will show in the finished surface and not everyone likes that look. If you eliminate the straw, then it’s crucial to get the ratio of clay to sand perfect. To do this, make some test patches on your floor and see how they dry. If they’re crumbly and weak, there’s not enough clay. If they crack, not enough sand.
More details on installing the leveling layer.

7. Finish
There are several options for finishing your beautiful adobe floor. (Have you noticed that there’s never just one way with natural building?)
If you chose to apply a thin final layer of clay, you have 2 options:
- apply 3mm finish layer, much like a clay plaster, but applied to the floor; when this layer is dry, seal as described below (more info and recipe).
- apply 1 to 4 coats of clay paint, also call “alis”; when this layer is dry, seal as described below (more info and recipe).
If you choose to burnish your floor, then as soon as the clay is completely dry, you can apply a sealer. The sealer densifies the top layer of clay (making it more durable & scratch-resistant), prevents dusting (so you don’t get clay on your butt when you sit on the floor), and reduces absorption (so makes it more stain-proof & easy to clean). The most common sealers are hardening oils, which react with oxygen in the air to chemically change into a hard, transparent, water-resistant, but breathable resin. Hardening oils include linseed oil (from flax seeds), hemp oil, tung oil, walnut oil, etc. The oil is applied in multiple layers, and each subsequent layer is thinned with a solvent to promote deep absorption into your floor’s surface. Common thinning solvents include citrus solvent (d-limonene based, i.e. orange peel) or mineral spirits (petroleum based). There are alternatives to oil & wax sealers, so feel free to do additional research / experimentation on that. (The most intriguing of all sealers to me is cow urine. Traditionally used in parts of Africa, it apparently makes for a stunning floor.) You can also add pigment to your sealer if you want to enhance the colour of your floor.

Here are the layers I most commonly use to seal a floor:
- 1st coat – pure hardening oil (1 litre covers approximately 4 square metres when applied full strength)
- 2nd coat – 80% hardening oil with 20% thinning solvent
- 3rd coat – 60% hardening oil with 40% thinning solvent
- optional 4th coat for high traffic or damp areas – 40% hardening oil with 60% thinning solvent
- optional beeswax paste to finish – if you want a really luscious surface that feels like leather, then I recommend a final coat of beeswax paste buffed into the surface of your sealed floor
Note on smells: the oils harden by oxidising, a chemical process that offgasses an aldehyde compound. Aldehydes are technically volatile organic compounds (VOCs), though the particular compound offgassed from oils has extremely low toxicity (unlike their cousin, formaldehyde, which is carcinogenic). However, there is definitely a smell that can linger (especially from linseed oil) and some people with respiratory issues may experience discomfort.

And what not to do…
- walk on them in stillettos (and probably, a ‘shoes off’ regime is best).
- install them in rooms where they’re likely to get wet – like bathrooms.
- drag heavy furniture around on them.
Specialist(s)
Thanks to Sigi Koko of Build Naturally for information, and Sigi and Earth Floors UK for images.
Thanks to the specialist(s) below for help with this topic over the years.

Sigi Koko is the principal designer at Down to Earth Design, which she founded in 1998 to help her clients manifest their dreams of living in a natural, healthy home. She also teaches natural building workshops that empower her clients to contribute creatively during the construction of their own home. You can find out more about her work on her website and blog.
Comments
Comments on Lowimpact.org are now closed. To comment or post a query about this topic, please go to the relevant section of the Growing the Commons forum.


29 Comments
Sigi, I moved into a house in Idaho with Earthen Floors. I’m from Texas. I originally thought they were stained floors quickly realized they were something else because there were sticky spots. While moving in my kids were playing video games and the game systems were siting on top of the plastic moving bins. After three days of this I realized it seemed something was happening to the floor under the plastic bins. After moving the bins it looks like mold and/or mildew had formed. I told the kids I think the heat from the game systems on the bins produced moisture between the floor and bin and caused this. What do you think? Can this be fixed? Why did this happen?
Dear Montoya,
Oh gosh, how dreadful. Unfortunately, it sounds like the base layers of the floor were not done correctly, which results in dampness from the ground below rising into the floor. Then anything blocking the top (furniture, rugs, bins, etc.) allow the moisture to build up even more…and damp materials allow mold to grow. Unfortunately the only way to fix is remove and do it correctly. I have an article here explaining the layers that should be there: http://buildnaturally.blogspot.com/2014/01/adobe-floor-basics-how-to-build-dirt.html
It’s definitely not heat, as heat generally dries things out instead of causing moisture to build up.
Sorry this probably is not the answer you were hoping for. Best of luck!
Sigi
I want to build an earth floor in m6y home, the floor is 22 metres about 60 square meters, what materials should I use?
Kaweesa – the answer is in the article, but feel free to post again if you have a specific question.
Nice, but in most locations there really no reason to insulate under a floor. You want to absorb heat during the summer and release heat during the winter. You do want to insulate the floor along the perimeter of the building.
Not Sure – yes, it says in the article that if you live in a hot country, skip the insulation. But in colder climates, you definitely need it, or the heat from your home will disappear into the earth.
We live in a home with a large earthen floor (along with tadelak walls and straw bale construction). What would you recommend in terms of maintaining the floor? How often should we re-apply oil or beeswax?
Also, we have a few stains (from our older dog who had an accident on the floor). How can we tint the floor back to the same colour?
Thanks for any guidance you can provide.
From our Specialist: Oiling only need to occur one time. Oil is applied in several consecutive layers until no more oil will absorb. It then polymerizes, ie, chemically changes into a resin. Wax, on the other hand, is a surface layer that will wear off depending on normal life activities and cleaning. You would treat any rewaxing on the same schedule you would use if it were a wood floor. Less frequently if you are shoeless house & use only non-harsh cleaners. More frequently if your floor gets lots of wear & tear or if you use cleaners with solvent.
In terms of staining, it is challenging to address, just like with a wood floor. You could try adding something to the entire floor that mimics what happened with the dog accident (though maybe not use the same liquid…!)
Hi
Can we contact any contractor or artisan for earthen floor installation in southern California? I would appreciate it if you could share such resources with us.
Thanks
Hi,
I wondered if you had ever done an external earthern floor for a basketball court? How would you seal it?
Earthen floors do require some maintenance, such as resealing or re-waxing periodically to maintain their durability and appearance.
Learn more info here
Earthen floors do require some maintenance, such as resealing or re-waxing periodically to maintain their durability and appearance.
Learn more info here
I just couldn’t leave your website before telling you that I truly enjoyed the top-quality info you present to your visitors. Will be back again frequently to check up on new posts.
More info about Maryland Concrete Foundations
I just couldn’t leave your website before telling you that I truly enjoyed the top-quality info you present to your visitors. Will be back again frequently to check up on new posts.
More info about Maryland Concrete Foundations
I found the information very helpful. That’s an awesome article you posted. I will come back to read some more after visiting this site.
Commercial Concrete
Excellent weblog, great work. Thanks for this!\
Check out more details
Hi I am working on a farming cooperative barn where food is going to be processed and cooked and we are very keen to build the floor from rammed earth.
Our main concern is that we use a trolly laden with food in our current barn (think a supermarket trolly filled with food) and we are worried the wheels will mark/dig into the floor. Is the floor sufficiently hard to bear this type of regular point loading. Thanks.
Hi Not Sure (number 5 above). Do you mean that you want your floor to absorb heat from the room in summer, and release heat to the room in winter? If so, then in cold climates you will need to insulate the perimeter of the floor well, and if the building has foundations you should insulate them externally down to the level of the base of the footings. Then as long as there is no significant, horizontal water movement (e.g. a flowing aquifer) below, over several years the subsoil or rock beneath the building will build up a level of warmth below your warm building such that heat loss downwards in winter becomes insignificant.
Hi,
Thanks for this great article.
I live in a flat in London that has really worn carpet and concrete underneath. I want to do my own clay floor ontop of the concrete and install underfloor heating also. Do i need to do all the layers? What would you suggest?
Thank you.
We put in an Adobe floor directly in red clay earth about 20 years ago. Now it has small cracks which are not a problem but this year we see patches of crumbling that get bigger when we sweep. The biggest is only about 6 inch square.
Can we just patch it. 20 years ago we were 60 but now getting down and doing a whole new floor is beyond us.
We could patch it if we knew the best way to do it. Can you give us some advise?
.
Hi there. I just finished a pretty large mud floor I’ve done that before but I’ve never burnished one. I’m having a hard time finding information on how to burnish what tool to use. Some of my floors are completely dry summer still drying. Do a re-wet the floors to burnish do I bring a lot of water into it or do I burn it up when it’s kind of on its way to dry out? Can I get some basic tips. Thank you so much!
Stephanie – Sigi has tech problems that are stopping her posting. But she asked me to post this: burnishing is a huge topic and best explained in person by doing it. So my cop out (but true) answer would be to make some test samples and practice burnishing with various smooth tools. Burnishing is just rubbing to tighten the surface and with clay materials it’s usually done with a flat stainless steel surface (like a stainless steel trowel).
She recommended ‘Earthen Floors’ by Sukita Ray Crimmel.
Hope that helps
Hi there, we live in Nova Scotia, Canada and installed 2 earthen floors in our straw-bale home. We built them according to Sukita’s book “Earthen floors”. The floors are 5 years old and we are noticing with our increasingly humid summers that our floors are getting very sticky when the humidity in our house rises above 70% and stays there. We live off grid and so running a dehumidifier is not an option. Any suggestions?
Hi there, we live in Tasmania Australia. we have an earthen floor but would like pour a top over it to level it up. How thin can this final coat be and do I need to dampen/wet the floor first?
Love your work. Thanks
Hi Carolyn, it sounds like you may have used raw linseed oil. Or hemp oil. Neither will completely polymerize (or they take a really long time to polymerize). The only fix I know is to take the sticky bit off with a solvent (like a citrus based solvent) and then reapply a true hardening oil. Tung oil is the hardest. “Boiled” linseed oil is less costly. Or you can make your own “stand oil” by taking raw linseed oil and polymerizing it in the sun. If you google “solar stand oil” you can find instructions for that. Best of luck!
Hi Jools, what you can put on top depends on what is there already. If you’ve sealed your existing floor, then anything you pour on top will not bond. In that case, you need a thick enough layer that it can stand alone (ie, 1″ or more). If you have not sealed the existing floor, then yes, dampen, and you can install as thin as 1/16″ to 1/8″. The caveat to that last part, is that if you have radical changes in thickness in that leveling layer, then I would add some kind of fiber into your top layer. Otherwise it will crack due to differences in drying time. Good luck!!
Great breakdown of the benefits! I love how earthen floors combine sustainability with functionality – the thermal mass aspect is such a smart way to save on heating bills while keeping a natural aesthetic. Plus, the creative opportunities with embedded materials make each floor truly unique!
Hello,
I just visited a site with earthen floor that had marmoleum installed that failed & I’m wondering what type of flooring could be put over the top. If moisture is prevalent, wood is not great & sheet goods would also suffer having to use adhesive. Thoughts/suggestions?
Thank you!
Gosh, I wouldn’t ever recommend marmoleum or any other sheet good on top of an earthen floor. There are a couple reasons that failure could have happened. 1. they didn’t put a capillary break & vapor barrier under the floor. In this case, moisture from the ground rises into the clay, and the linoleum (or any other sealer) prevents the moisture from escaping. Over time the clay becomes damp and soft and not a good floor anymore. 2. the mix could have been inadequate. Any finish material can only perform as well as the substrate that it is connected to.
If the goal is linoleum or wood, I would build a framed floor…that is what those materials are symbiotic with. If you want an earthen slab floor, then I would prepare the base as described above, and then seal it when it’s completely dry. A good earthen floor functions the same as a wood floor.